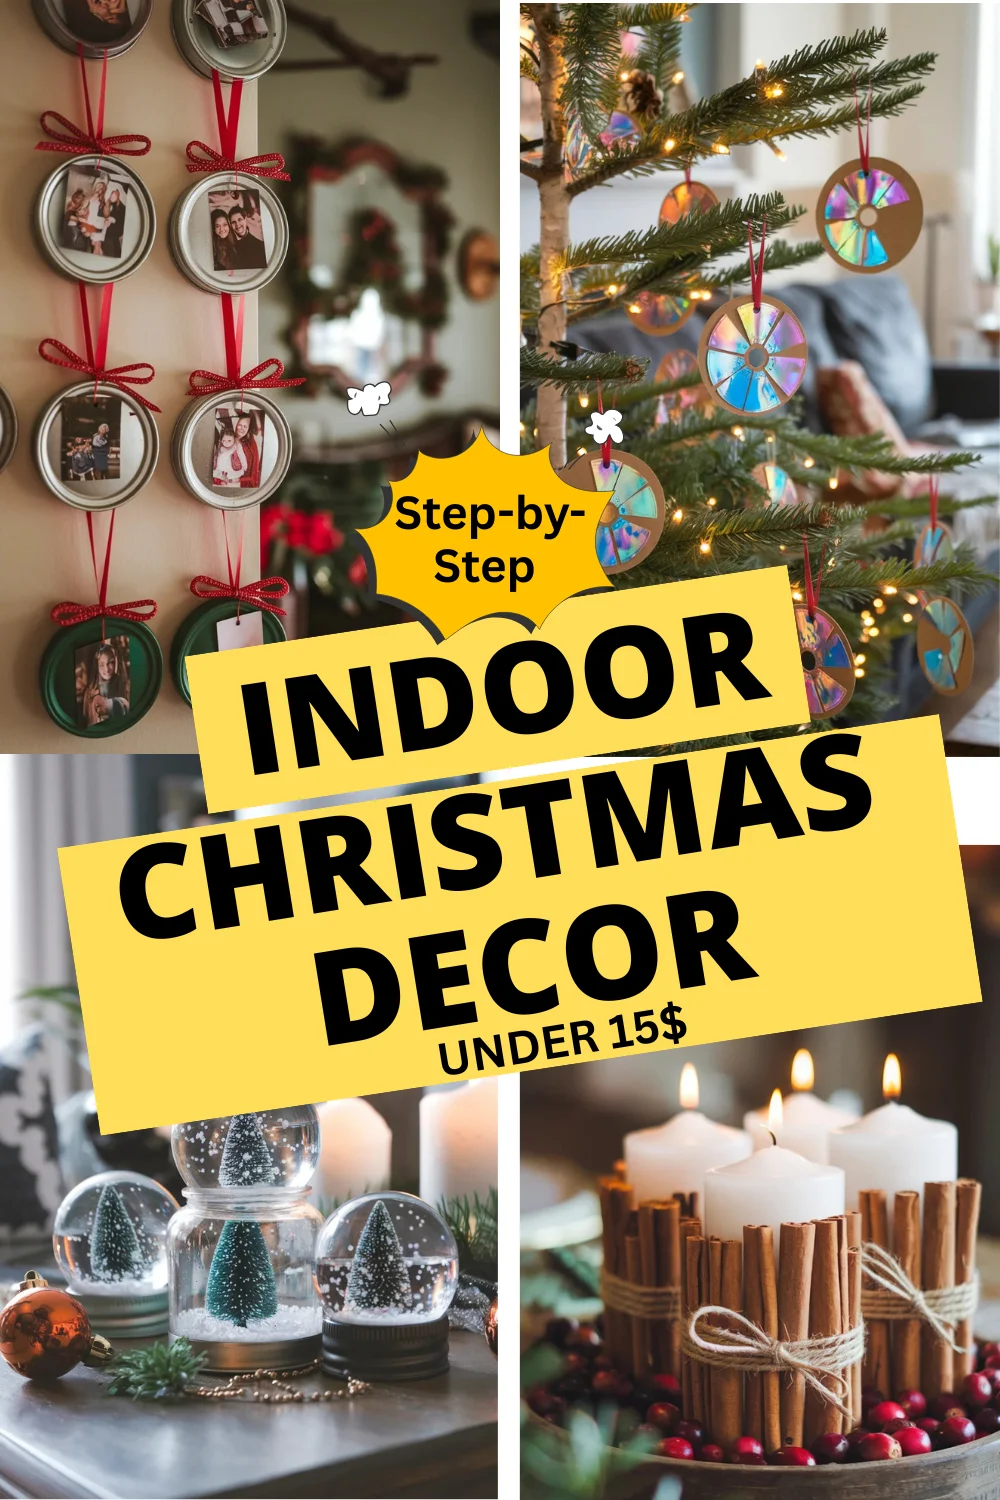
DIY Indoor Christmas Decor Ideas
Transform your home into a festive wonderland with these charming handmade Christmas decorations. Each project uses simple materials and techniques to create beautiful, budget-friendly holiday decor.
Rustic Embroidery Hoop Wreaths with Plaid Pockets
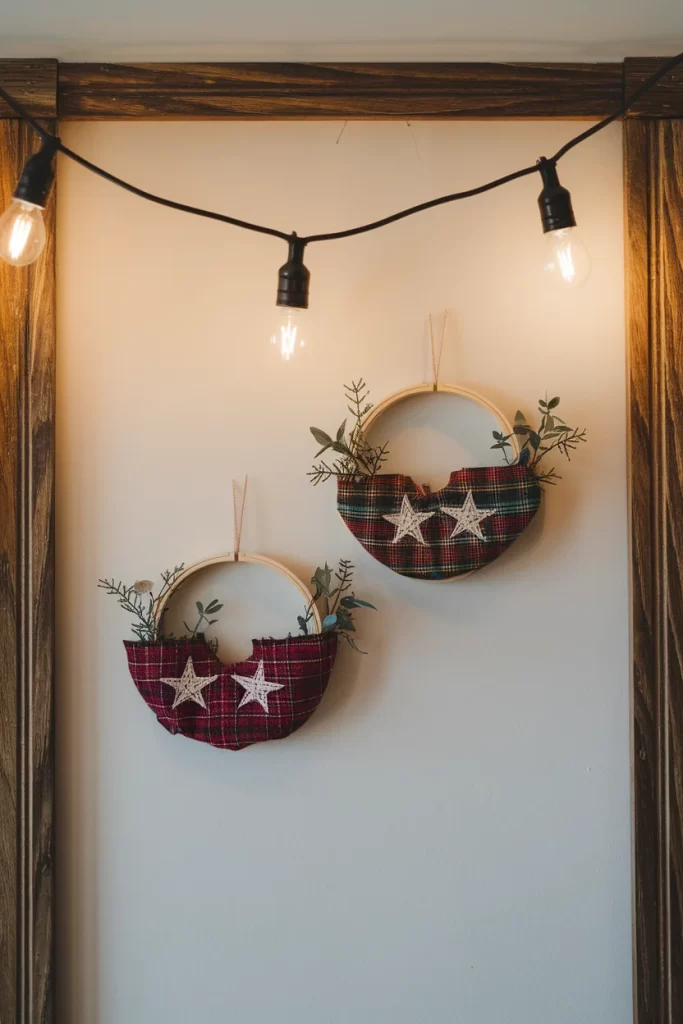
Create cozy wall hangings that combine natural elements with festive fabric accents.
Materials needed:
- Wooden embroidery hoops (6-8 inches)
- Plaid fabric (red and green/navy patterns)
- White felt for stars
- Fresh or artificial greenery sprigs (eucalyptus, fern fronds)
- Twine for hanging
- Hot glue gun and glue sticks
- Scissors
Steps:
- Cut plaid fabric into half-circle pocket shapes, approximately 4 inches wide
- Fold the top edge down about 1/2 inch and hot glue to create a finished edge
- Glue the curved bottom and sides of fabric to the inside bottom of the embroidery hoop, forming a pocket
- Cut small star shapes from white felt and glue them onto the plaid fabric
- Insert fresh greenery sprigs into the fabric pocket, arranging naturally
- Attach twine to the top of the hoop for hanging
- Display at varying heights under string lights for a warm, rustic look
Wooden Spoon Christmas Carolers

Turn ordinary kitchen utensils into charming holiday characters with painted faces and festive accessories.
Materials needed:
- Wooden spoons
- Acrylic paint (white, red, green, black, pink)
- Small felt pieces in holiday colors
- Tiny white pom-poms
- Sheet music or paper with musical notes printed
- Green felt balls for garland
- Small paintbrushes
- Hot glue gun
- Black fine-tip marker
Steps:
- Paint the bowl of each spoon with white paint for the face; allow to dry completely
- Use a black marker to draw simple dot eyes and curved smile lines
- Add small pink dots for rosy cheeks using paint or marker
- Create mini winter hats by cutting and shaping small pieces of colored felt
- Glue the felt hats to the top of each spoon, adding white pom-poms to the tips
- Cut small rectangles from sheet music and fold them accordion-style
- Glue the folded music sheets to the spoon handles as songbooks
- String green felt balls on thread to create tiny garlands around their necks
- Arrange the carolers standing upright in a display area
Upcycled CD Christmas Tree Ornaments
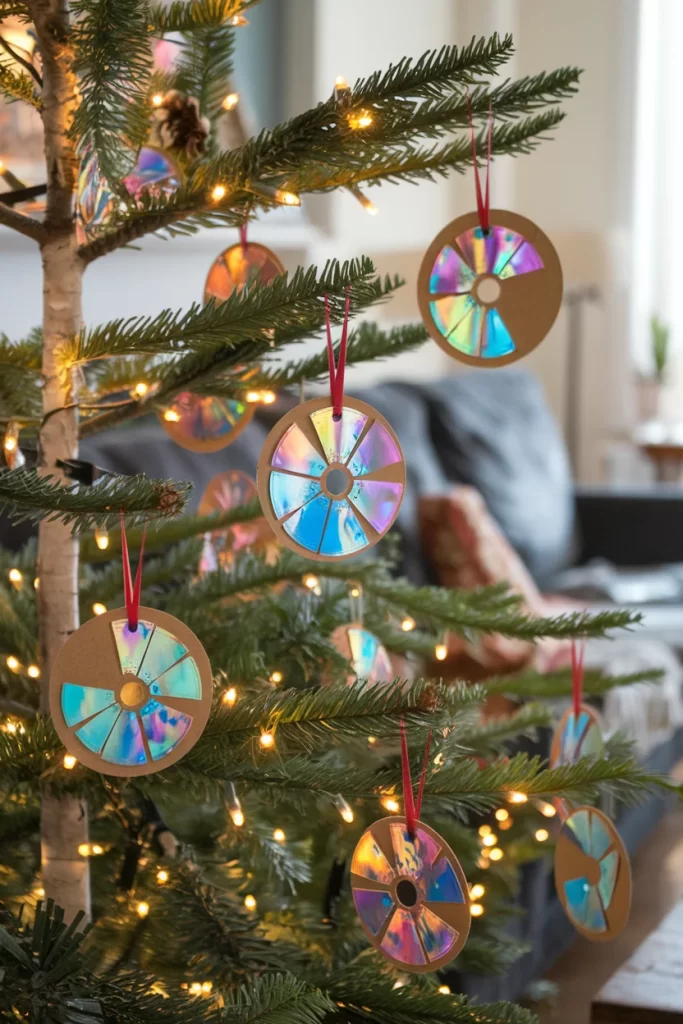
Transform old CDs into dazzling rainbow ornaments that catch and reflect light beautifully.
Materials needed:
- Old CDs or DVDs
- Brown cardboard or kraft paper backing
- Red ribbon (1/4 inch wide)
- Hole punch or drill with small bit
- Hot glue gun
- Scissors
- Pencil for tracing
Steps:
- Trace around each CD on brown cardboard and cut out circles
- Hot glue the cardboard to the back of each CD to hide any text and create a uniform look
- Punch a small hole near the edge of each ornament
- Thread red ribbon through the hole and tie a loop for hanging
- Create clusters of different sizes by using various CD types (standard CDs, mini CDs if available)
- Hang at different lengths on your Christmas tree to catch and scatter light throughout the branches
- The prismatic surface will create beautiful rainbow reflections when light hits them
Gingerbread House Paper Garland
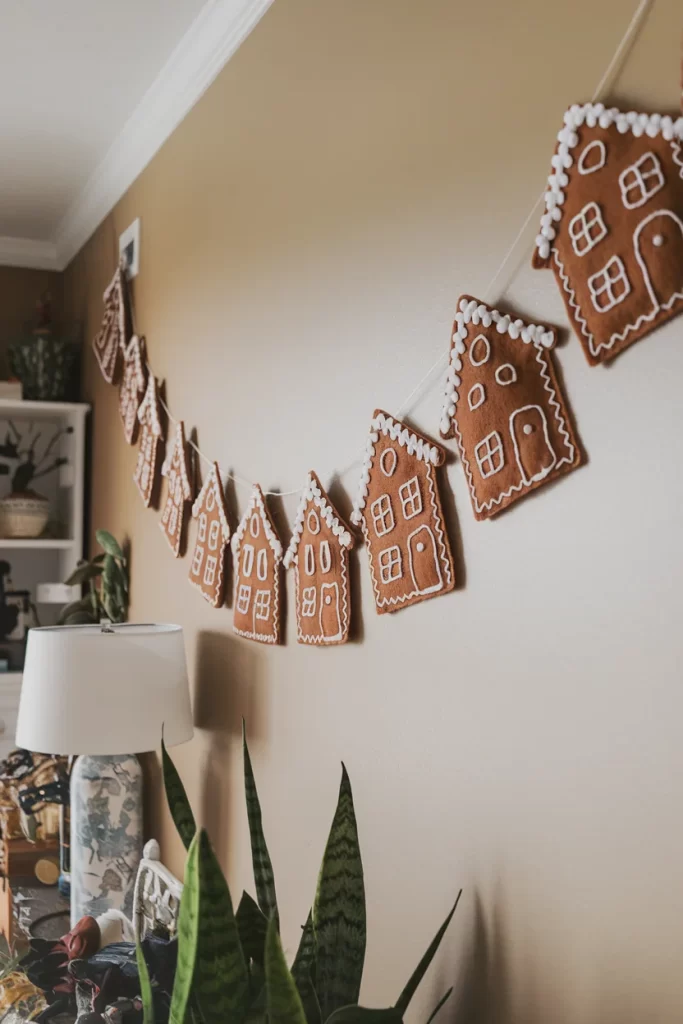
Create a whimsical village garland using brown paper and white icing details.
Materials needed:
- Brown kraft paper or cardstock
- White gel pen or paint pen
- House-shaped template or stencil
- Twine or string for hanging
- Mini clothespins or paper clips
- Scissors
- Ruler
Steps:
- Create or download a simple gingerbread house template with windows, doors, and roof details
- Trace the template onto brown paper multiple times, creating 8-12 houses
- Cut out all the house shapes carefully
- Use a white gel pen or paint pen to draw “icing” details: window frames, door outlines, roof trim, and decorative dots
- Add charming details like wreaths on doors, window panes, and scalloped roof edges
- Once dry, attach each house to twine using mini clothespins, spacing them evenly
- Hang the garland along walls, mantels, or doorways for a sweet village display
Yarn-Wrapped Star Wall Art
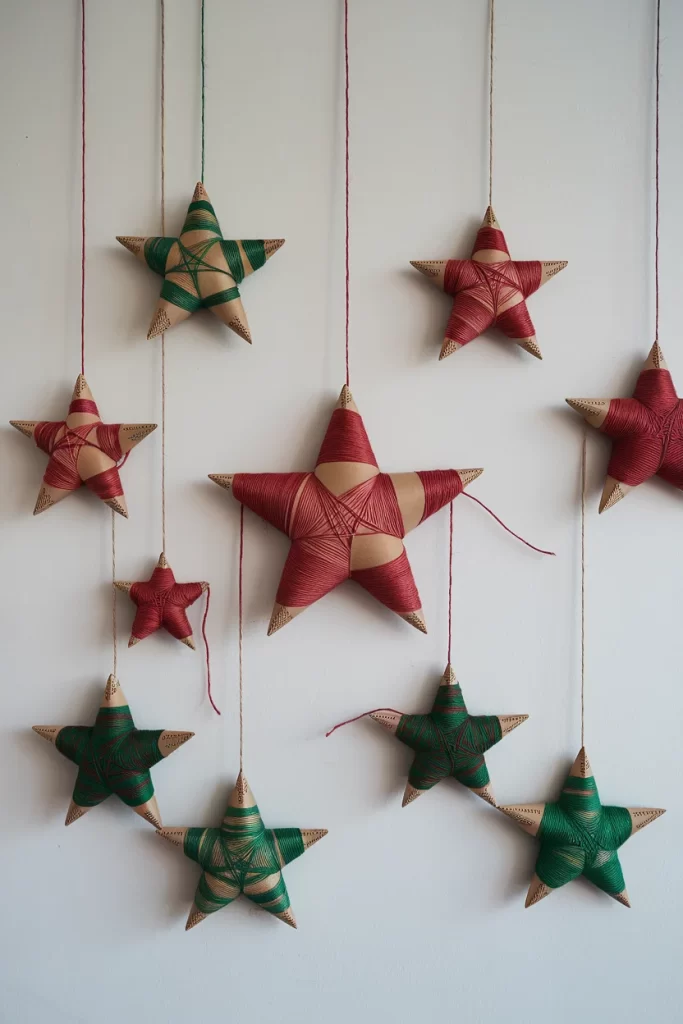
Create a stunning wall display using cardboard stars wrapped in festive yarn.
Materials needed:
- Cardboard (cereal boxes work well)
- Red and green yarn or embroidery thread
- Star template (5-pointed stars in various sizes)
- Scissors
- Pencil
- Colored thread or thin ribbon for hanging
- Small nails or pushpins for wall mounting
Steps:
- Draw or trace star shapes in 3-4 different sizes on cardboard
- Cut out the star shapes carefully, ensuring clean edges
- Starting at one point, begin wrapping yarn around each star, going from point to point
- Continue wrapping in different directions to create geometric patterns
- Secure the yarn end with a small dab of glue on the back
- Leave some areas of cardboard exposed for contrast
- Thread thin cord through one star point for hanging
- Arrange stars at different heights on the wall using small nails or pins
Fair Isle Knitted Holiday Pillows
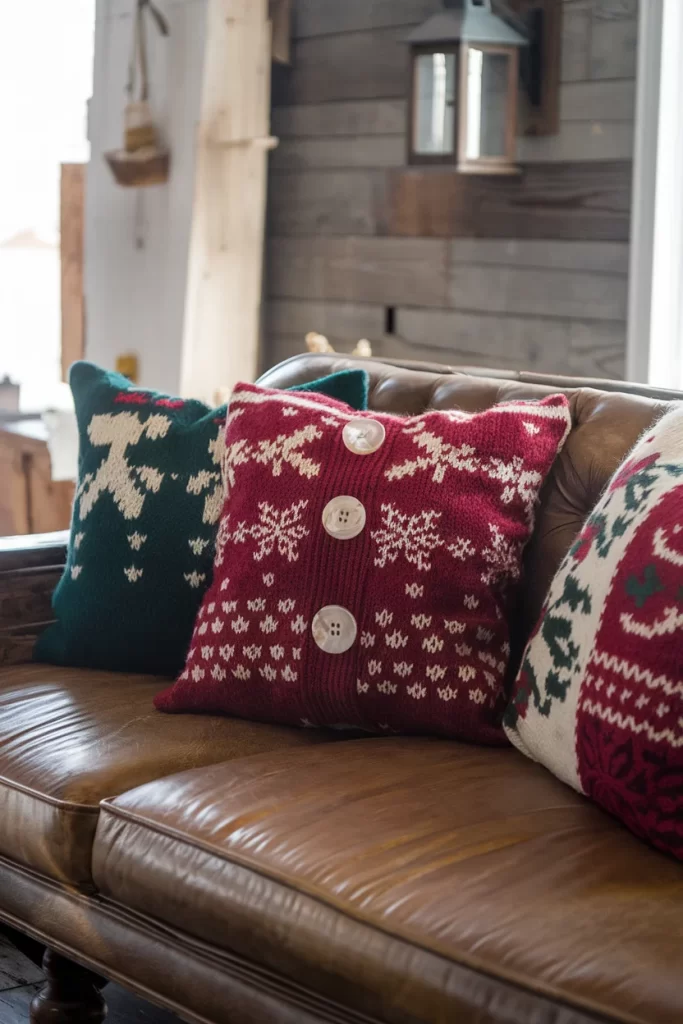
Create cozy Nordic-inspired throw pillows with traditional Christmas patterns and button details.
Materials needed:
- Worsted weight yarn in 3-4 colors (cream, burgundy, teal, forest green)
- Knitting needles (size 8 or 10)
- 4-6 wooden buttons (cream or natural wood)
- Pillow insert (16×16 or 18×18 inches)
- Tapestry needle for sewing
- Stitch markers
- Pattern chart for Fair Isle designs
- Scissors
Steps:
- Choose your Fair Isle pattern – classic snowflakes, geometric stars, or traditional Nordic motifs work beautifully
- Cast on stitches for front panel using your main color (typically cream or burgundy)
- Follow your chosen colorwork chart, carrying yarn colors across the back as you knit
- Create the front panel with your decorative pattern, keeping edges neat
- Knit a plain back panel in your main color, adding buttonholes along one edge
- For button-front style: create a overlapping back panel with 4-6 evenly spaced buttonholes
- Block both pieces to ensure even tension and shape
- Sew three sides together with right sides facing, turn right-side out
- Attach buttons to correspond with buttonholes on the back panel
- Insert pillow form and button closed for easy removal and washing
Cinnamon Stick Advent Candles
Combine the warm scent of cinnamon with elegant candle displays.
Materials needed:
- White pillar candles (various heights)
- Cinnamon sticks
- Jute twine or raffia
- Large wooden tray or plate
- Fresh cranberries
- Hot glue gun (optional)
- Scissors
Steps:
- Measure cinnamon sticks against each candle – they should be slightly shorter than the candle height
- Arrange cinnamon sticks vertically around each candle, covering the entire circumference
- Secure the sticks by wrapping jute twine tightly around the middle and tying in a bow
- For extra security, add small dots of hot glue between the candle and cinnamon sticks
- Place the decorated candles on a large wooden tray
- Scatter fresh cranberries around the base of the candles for color and texture
- Light carefully and never leave unattended – the cinnamon will release a lovely fragrance
Folded Book Page Christmas Trees
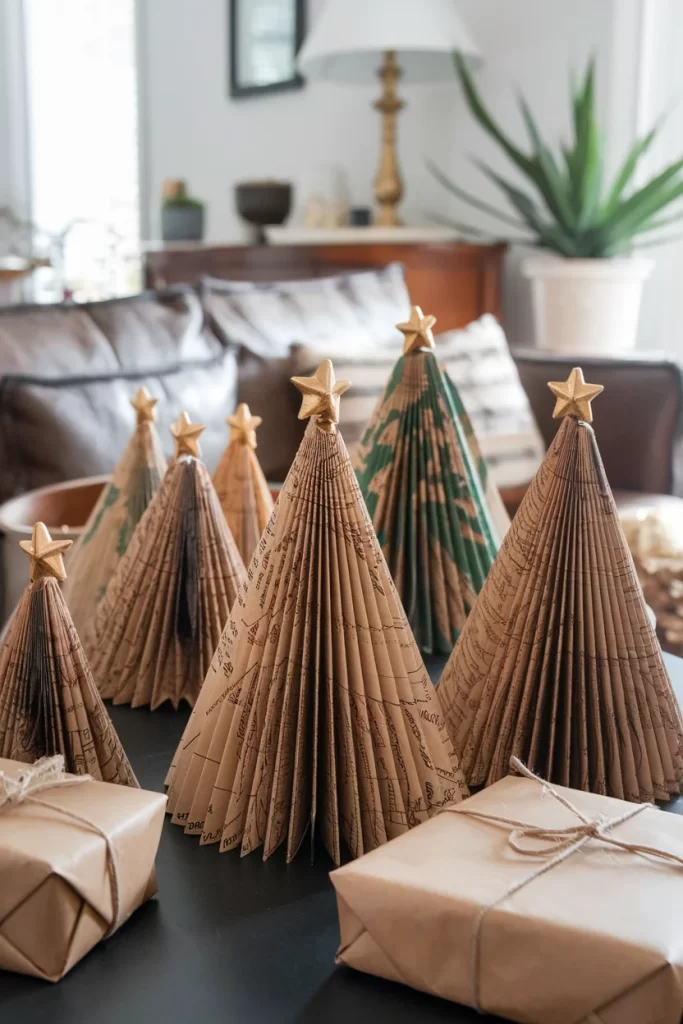
Transform old books, sheet music, or maps into elegant paper Christmas trees with accordion folds.
Materials needed:
- Old books, sheet music, or vintage maps
- Small wooden stars (craft store or cut your own)
- Craft glue or hot glue gun
- Ruler
- Pencil
- Craft knife or scissors
- Bone folder or credit card (for crisp folds)
- Optional: green paint or markers for accent color
Steps:
- Select pages with interesting text, musical notes, or map details for visual appeal
- Cut pages into squares – use 8×8 inches for large trees, 6×6 for medium, 4×4 for small
- Fold each square diagonally in half to create a triangle
- Starting from the folded edge, make accordion pleats every 1/4 to 1/2 inch across the triangle
- Use a bone folder or credit card to make sharp, crisp creases
- Once fully pleated, pinch the bottom point and fan out the top to form a tree shape
- Apply a small dot of glue at the bottom point to hold the accordion shape
- Glue a small wooden star to the very top point of each tree
- Create a forest by making trees in various sizes using different types of paper
- For stability, you can glue the bottom of each tree to a small cardboard base
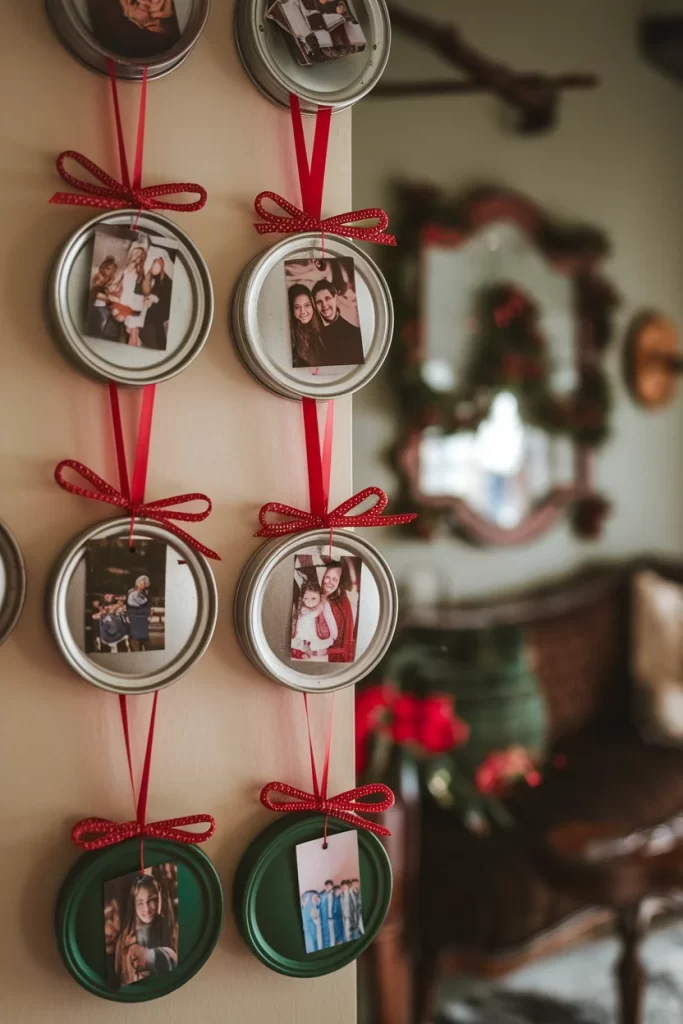
Mason Jar Lid Photo Ornaments

Turn family photos into personalized Christmas tree decorations using mason jar lids.
Materials needed:
- Mason jar lids (regular and wide-mouth sizes)
- Family photos (printed to fit inside lids)
- Red ribbon (1/4 to 1/2 inch wide)
- Hole punch
- Hot glue gun
- Scissors
- Cardboard backing (optional)
Steps:
- Select favorite family photos and size them to fit inside your mason jar lids
- Print photos and cut to fit, leaving a small border
- If desired, glue photos to small cardboard backing for durability
- Center and glue each photo inside a mason jar lid
- Punch two holes at the top of each lid, spacing them about 1/2 inch apart
- Thread ribbon through both holes from the back and tie into a bow on the front
- Create a hanging loop with the ribbon ends
- Mix different lid sizes and arrange on your tree for a personal touch
Tin Can Luminaries with Snowflake Patterns
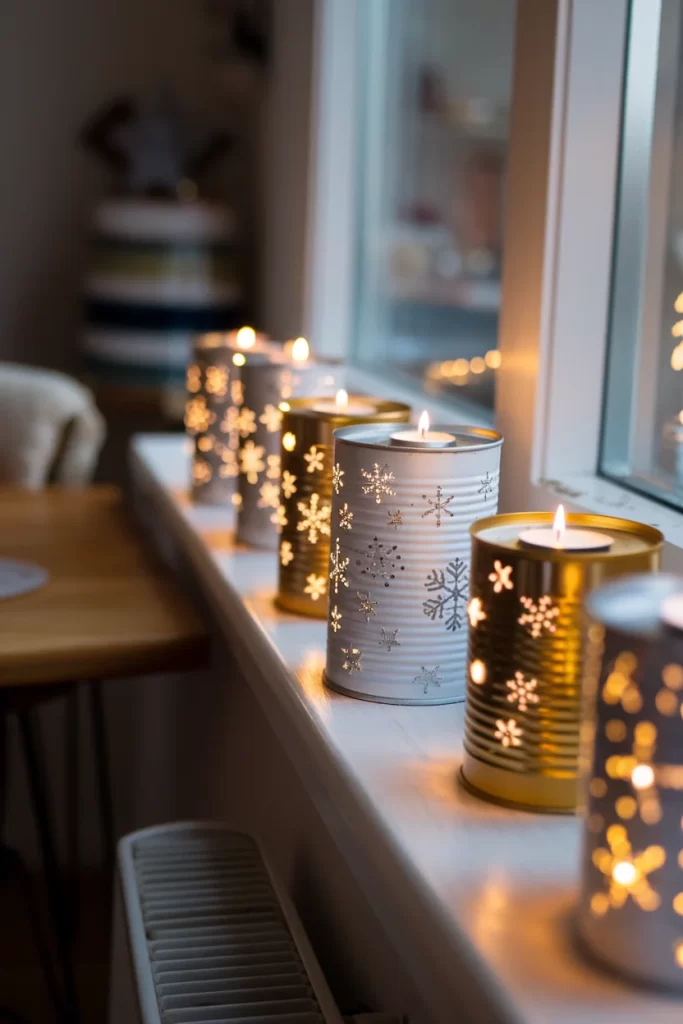
Transform everyday tin cans into magical light displays with punched snowflake designs.
Materials needed:
- Clean tin cans (various sizes)
- Nail and hammer
- Snowflake templates
- Tape
- LED tea lights or battery-operated string lights
- Spray paint (white, gold, or silver – optional)
- Towel
- Water (to fill cans while punching)
Steps:
- Remove labels from clean tin cans and fill with water; freeze overnight to prevent denting
- Print or draw snowflake patterns on paper, sized to fit your cans
- Tape the patterns around the outside of the frozen cans
- Place the can on a towel and use a nail and hammer to punch holes along the pattern lines
- Work quickly before the ice melts, or refreeze as needed
- Remove the ice and paper template once all holes are punched
- If desired, spray paint the cans in festive colors and let dry
- Place LED tea lights or small string lights inside each can
- Arrange on windowsills, mantels, or tables for ambient holiday lighting
Wine Cork Reindeer Bookshelf Decorations
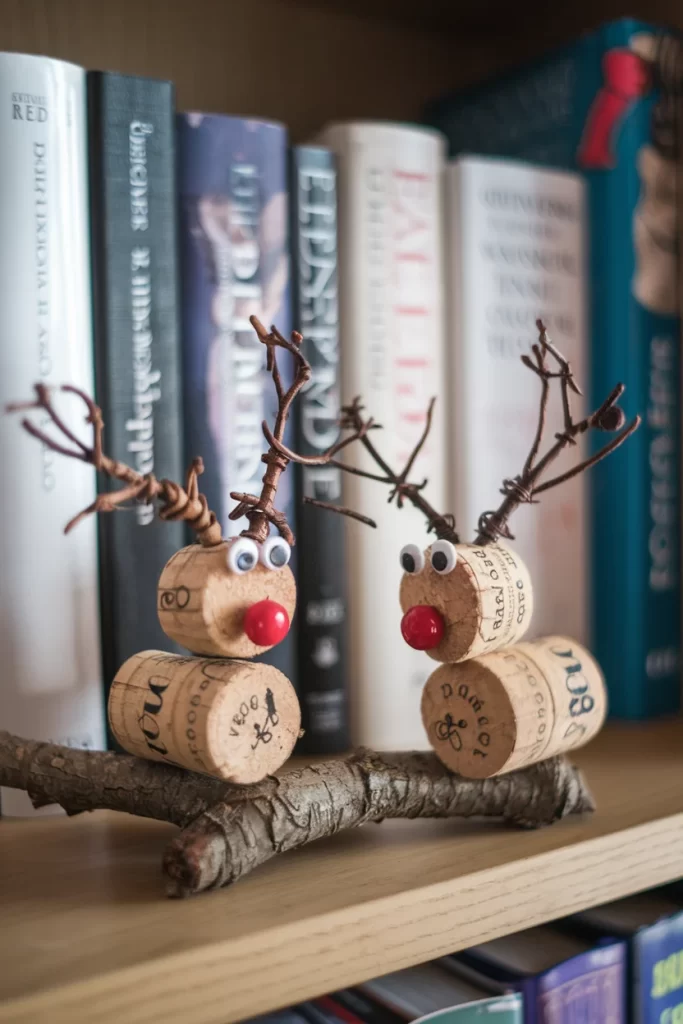
Transform wine corks into adorable reindeer that perch perfectly on bookshelves and mantels.
Materials needed:
- Wine corks (2 per reindeer)
- Small twigs or thin branches for antlers
- Large googly eyes
- Red wooden beads or small red pom-poms for noses
- Hot glue gun and glue sticks
- Small drill bit or sharp awl
- Natural wood branch for display base
- Black fine-tip marker (optional)
Steps:
- Stack two wine corks vertically and hot glue together firmly – bottom cork is body, top is head
- Let glue set for 5 minutes to ensure strong bond
- Use awl or small drill bit to make holes in top cork for antler placement
- Break small twigs into 2-3 inch pieces, choosing ones with natural branching
- Insert twig antlers into holes and secure with hot glue
- Glue googly eyes onto the head cork, positioning slightly apart
- Attach red bead or pom-pom below eyes as Rudolph’s nose
- Optional: add tiny black marker dots for mouth
- Set your reindeer family on a natural branch between books on your shelf
- Create 2-3 reindeer for the best effect
Pro tip: Use corks from different wines for varied textures and colors on the bodies.
Handmade Clay Star Ornaments with Carved Details
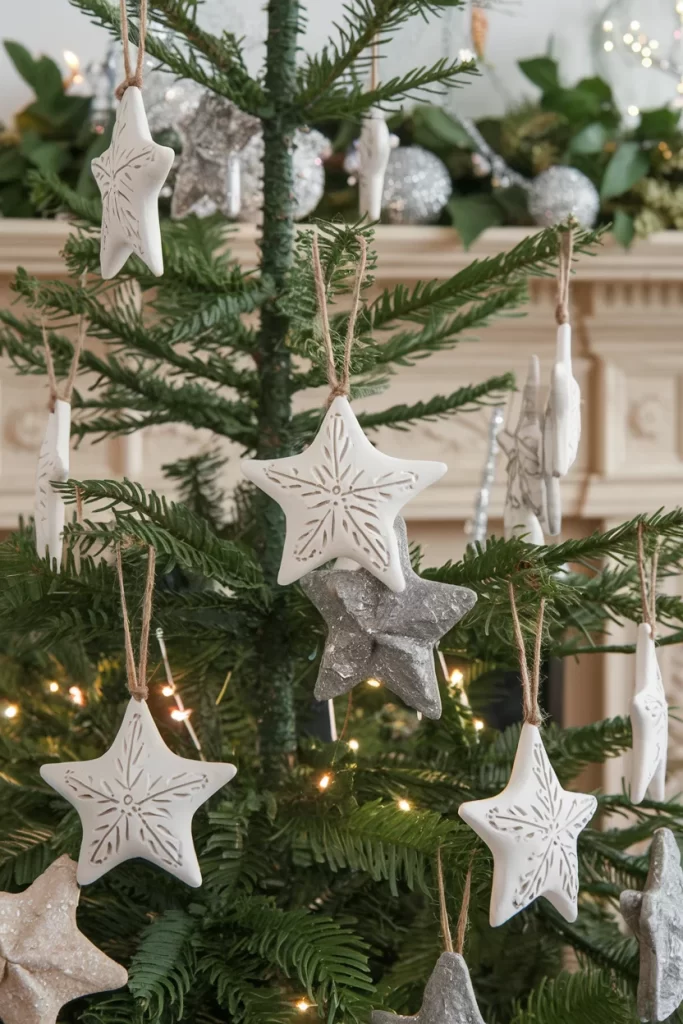
Create elegant Scandinavian-style star ornaments with delicate hand-carved patterns.
Materials needed:
- White air-dry clay or polymer clay
- Gray clay for contrast stars
- Star cookie cutters (2-3 different sizes)
- Clay carving tools or wooden skewers
- Natural jute twine
- Rolling pin
- Parchment paper
- Small drill or awl for hanging holes
- Clear matte sealant (optional)
Steps:
- Roll clay to 1/4 inch thickness on parchment paper
- Cut stars using cookie cutters – make both white and gray versions
- While clay is still soft, use carving tools to etch patterns:
- Radiating lines from center to each point
- Delicate leaf or fern fronds
- Snowflake-inspired geometric designs
- Vary the pressure to create different line depths and textures
- Use awl to make hanging hole near one star point before clay hardens
- Allow white clay stars to air dry 24-48 hours (or follow polymer clay baking instructions)
- Once completely dry, lightly sand any rough edges
- Thread jute twine through holes and tie hanging loops
- Mix white and gray stars on tree branches for beautiful natural contrast
- The carved details will cast lovely shadows when lit by tree lights
Design variations: Try different carved patterns like Nordic runes, simple dots, or crosshatch textures.
Mason Jar Nativity Luminaries
Transform mason jars into glowing nativity scenes with silhouette cutouts and LED lights.
Materials needed:
- Mason jars (3 different sizes recommended)
- White cardstock or vellum paper
- Nativity silhouette templates
- Battery-operated LED fairy lights (warm white)
- Natural moss or dried grass
- Small star decals or stickers
- Craft knife with fresh blades
- Scissors
- Glue stick
- Cutting mat
Steps:
- Find or create nativity silhouette templates sized for your jars
- Print templates on white cardstock – include Holy Family, shepherds, wise men scenes
- Carefully cut out silhouettes using craft knife on cutting mat
- Measure interior circumference of jars and cut cardstock strips to fit
- Arrange and glue silhouettes onto cardstock strips at bottom edge
- Add small star stickers scattered above silhouettes as night sky
- Roll cardstock strips and insert into jars with silhouettes facing outward
- Place small amount of moss in bottom of each jar for ground
- Coil LED fairy lights inside jars, positioning behind silhouettes for backlighting
- Test lighting effect and adjust light placement for even glow
- Arrange all three jars together to tell the complete nativity story
Lighting tip: Use battery packs outside jars and thread just the light strand inside for easy on/off access.
DIY Snow Globe Collection
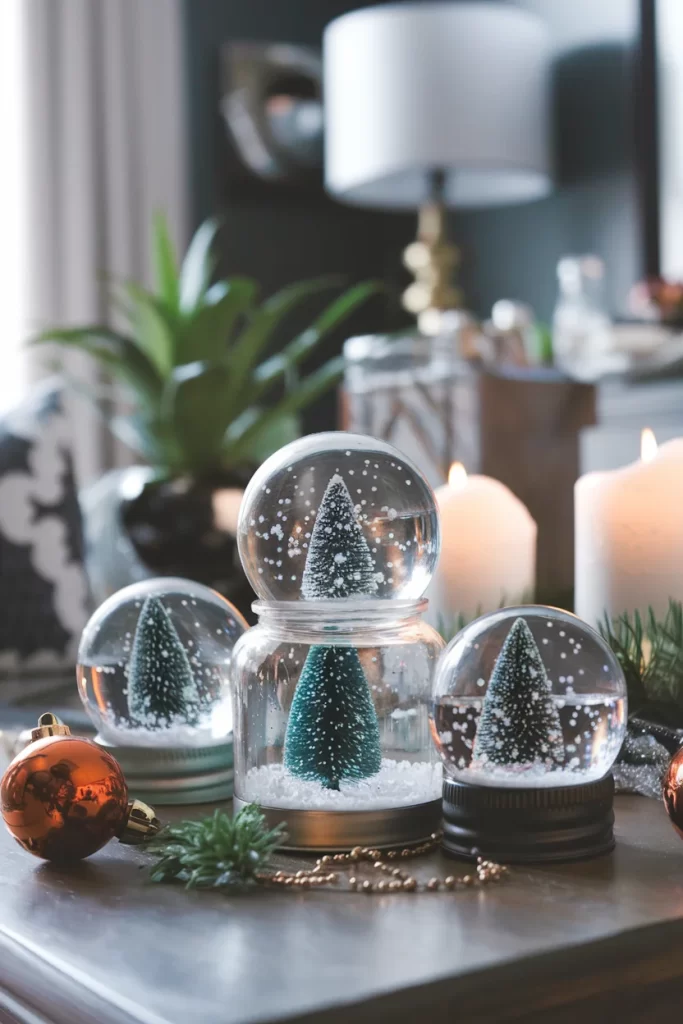
Create enchanting miniature winter scenes inside glass jars with bottle brush trees and swirling snow.
Materials needed:
- Clear glass jars with tight-fitting lids (various sizes)
- Small bottle brush Christmas trees in different heights
- Fine white glitter or artificial snow
- Glycerin (pharmacy section)
- Distilled water
- Waterproof epoxy or aquarium-safe silicone
- Small funnel
- White acrylic paint for lids
- Small paintbrush
Steps:
- Clean jars thoroughly and remove all labels
- Paint jar lids with white acrylic paint; let dry completely
- Plan your tree arrangement – use different heights for visual interest
- Apply waterproof epoxy to inside of jar lid
- Firmly press bottle brush trees into epoxy, creating a mini forest scene
- Allow epoxy to cure for 24 hours before proceeding
- Fill jar almost completely with distilled water, leaving 1/2 inch space at top
- Add 1 teaspoon glycerin to slow the “snow” fall
- Using funnel, add 1-2 tablespoons of fine white glitter or artificial snow
- Carefully screw on lid with trees, ensuring no leaks
- Test by gently shaking and turning upside down
- Group multiple sizes together for a magical snow globe village
Felt Ball Snowman Garland
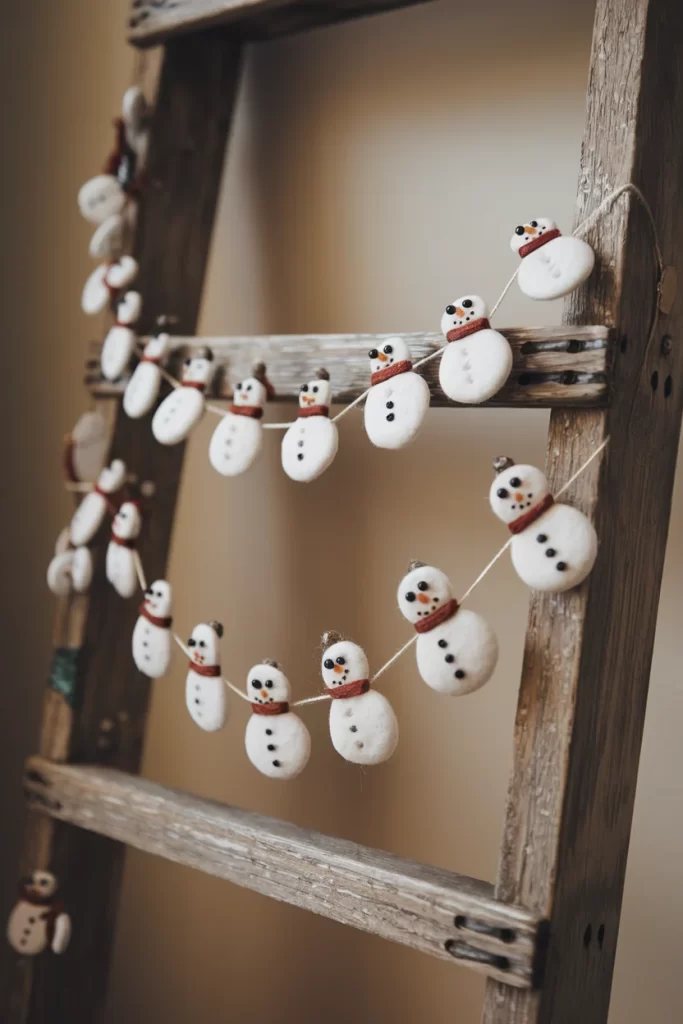
Create a whimsical garland of tiny snowmen using white felt balls and miniature accessories.
Materials needed:
- White wool felt balls (2 sizes: 1 inch and 3/4 inch)
- Black seed beads or tiny black felt pieces
- Orange polymer clay or felt scraps
- Red and brown fabric strips for scarves
- Strong white thread or clear fishing line
- Large needle
- Fabric glue
- Small scissors
- Tweezers (helpful for small pieces)
Steps:
- Plan garland length and calculate felt balls needed (2 per snowman)
- Thread needle with strong thread, leaving long tail for hanging
- String felt balls: large ball (body), then small ball (head), continuing pattern
- Space each snowman about 2-3 inches apart on the thread
- For faces: glue tiny black beads or felt dots for eyes and mouth buttons
- Create tiny orange carrot noses from clay or felt triangles
- Use tweezers to position and glue noses between the eyes
- Cut fabric into thin strips (1/8 inch wide, 2 inches long) for scarves
- Tie mini scarves around the “neck” where head meets body
- Trim scarf ends at angles for realistic look
- Add tiny black dots down the body as coat buttons
- Hang garland using hooks or nails, allowing gentle draping curves