22+ Creative Pumpkin Carving Designs That Will Make Your Halloween Display Stand Out
Transform your ordinary pumpkins into stunning Halloween masterpieces with these creative carving ideas that go far beyond the traditional jack-o’-lantern. Whether you’re a beginner looking for simple patterns or an experienced carver ready for intricate designs, this collection offers something for every skill level.
3D Sculptured Face with Teeth
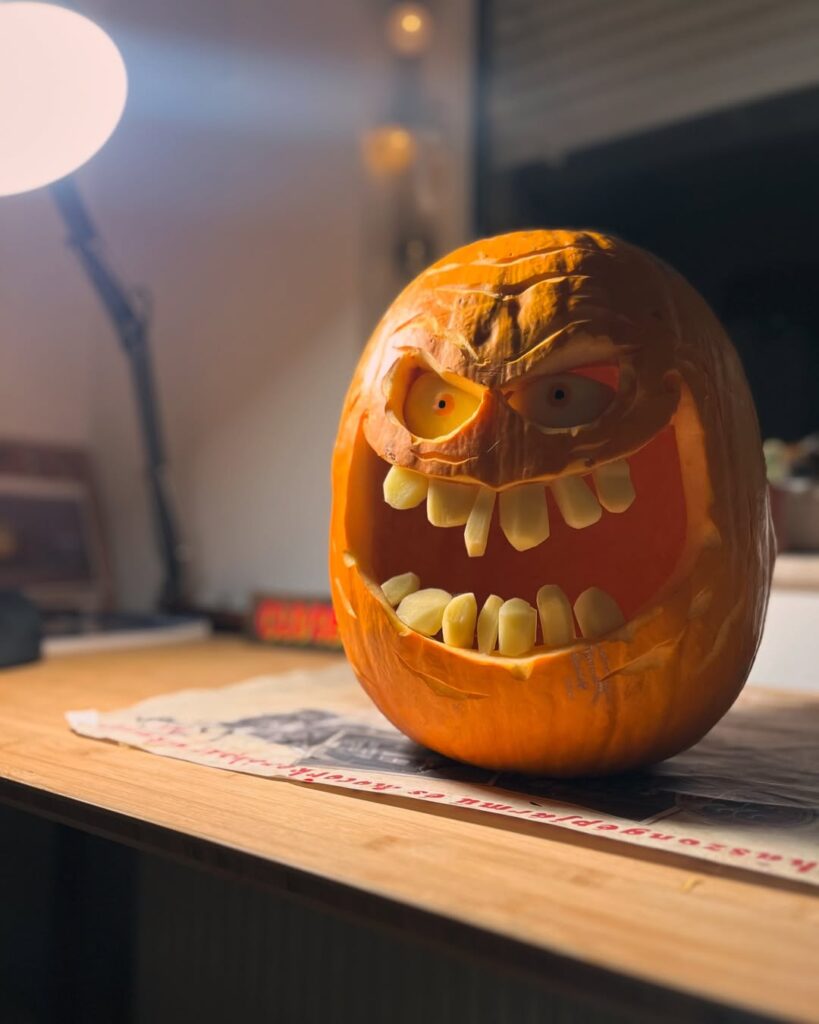
This features carved pumpkin flesh sculpted into realistic teeth and gums. The technique involves:
- Carving away the outer skin to create depth
- Carefully shaping individual teeth from the inner pumpkin flesh
- Creating layered depths for the mouth cavity
- Adding texture to simulate gums and facial features
- Using different carving depths to create shadows and dimension
Illuminated Jack-O’-Lanterns
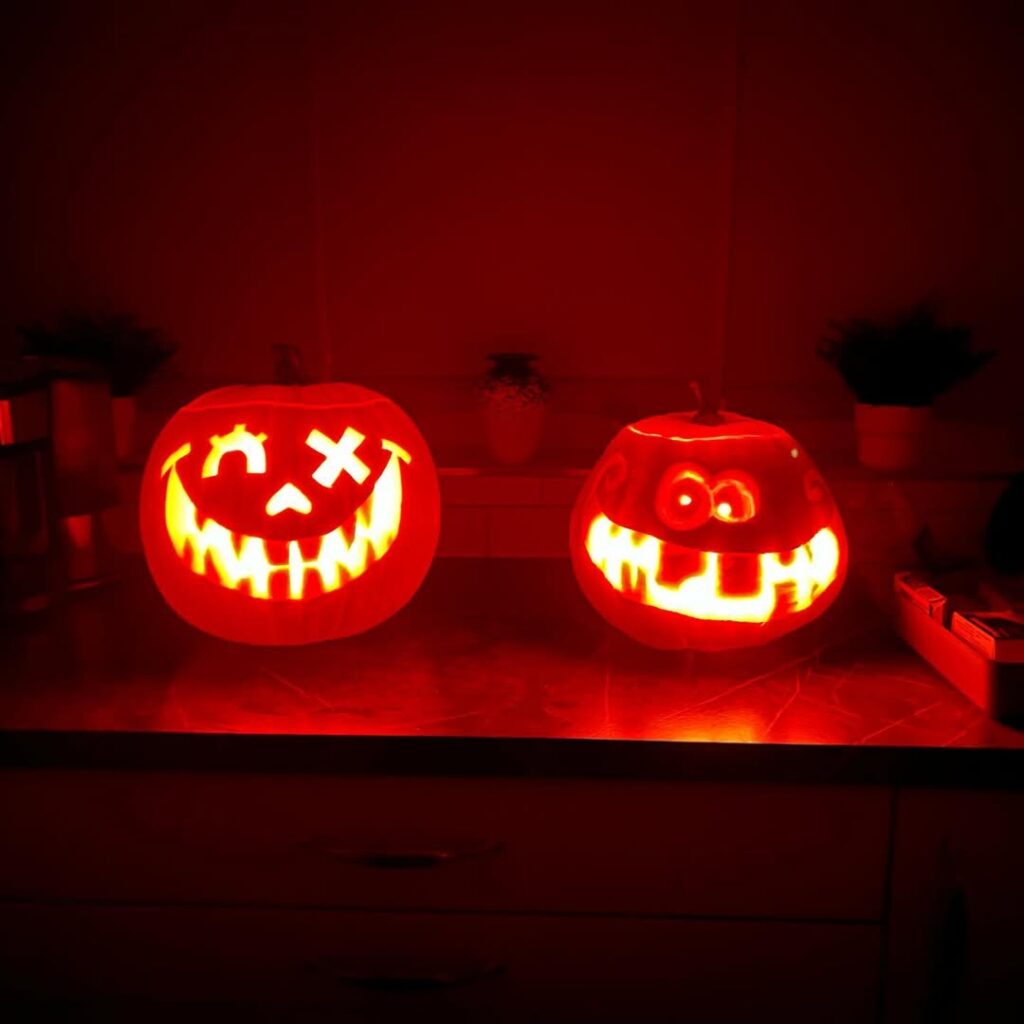
Two classic carved pumpkins with internal lighting showing:
- Traditional triangle and circular eye designs
- Wide, toothy grins carved through the pumpkin wall
- LED or candle lighting from inside to create the glowing effect
- Clean cut-throughs that allow maximum light passage
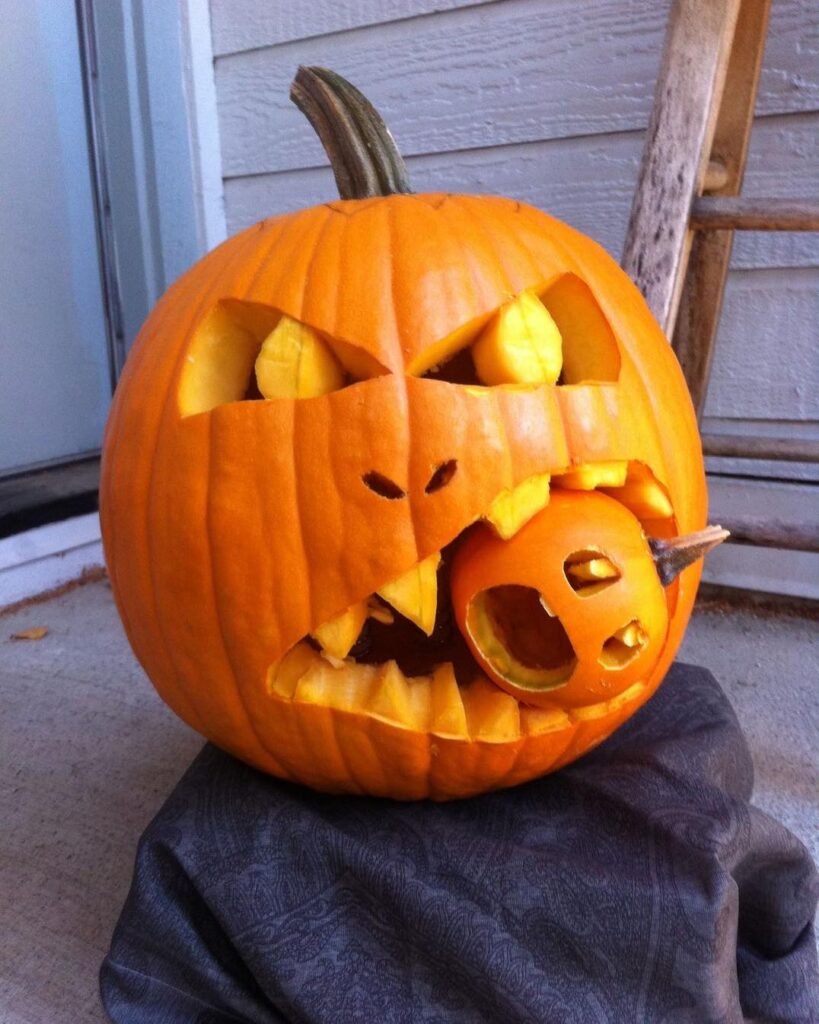
Two-Tone Cannibal Pumpkin

A creative design showing one pumpkin “eating” another:
- Deep carving on one side exposing the inner flesh
- A smaller decorative pumpkin placed inside the mouth
- Strategic cuts to create a menacing expression
- Use of the natural color contrast between skin and flesh
- “Blood” effect created with red gel or paint
Disney Castle Silhouette with Mickey Mouse
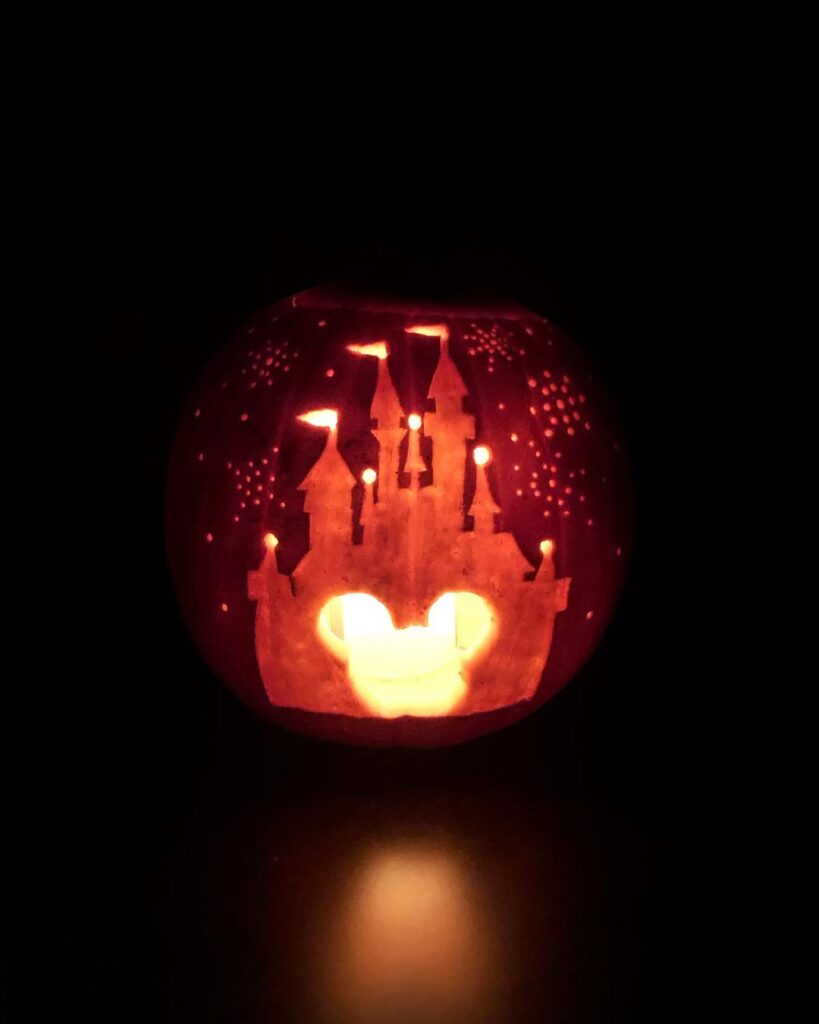
This elegant carving features a majestic Disney castle with multiple turrets and spires rising above Mickey Mouse’s iconic head silhouette. The castle is adorned with small carved dots representing fireworks or stars in the night sky, creating a magical, enchanting atmosphere. The intricate detail work captures the essence of Disney’s fairy tale castles, making it perfect for Disney park enthusiasts.
Baby Yoda (Grogu)
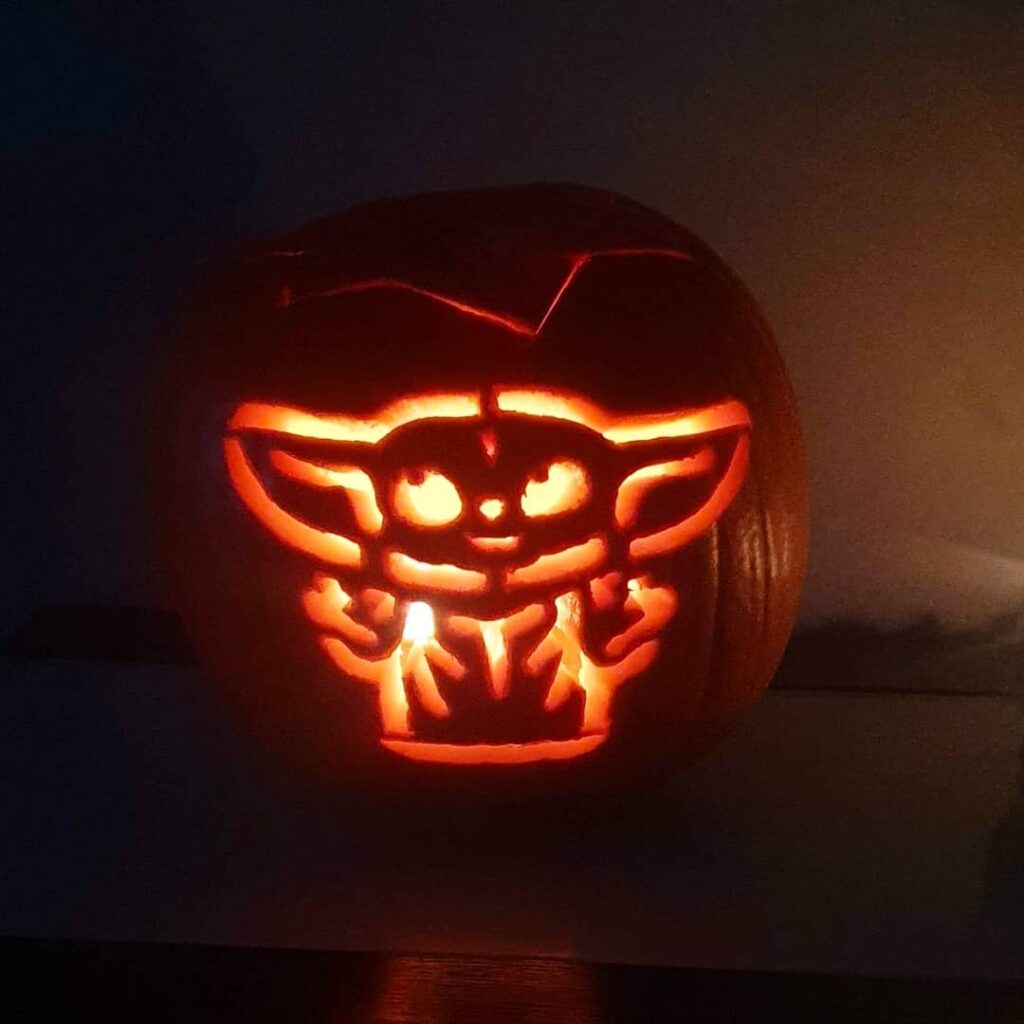
This adorable carving depicts Baby Yoda from The Mandalorian, with his characteristic large ears, expressive eyes, and tiny hands reaching outward. The three-dimensional effect created by varying carving depths brings the beloved character to life, capturing his endearing charm and making this a popular choice for Star Wars and Disney+ fans.
“It’s Fine” Dog Meme

This humorous carving recreates the famous “This is Fine” meme dog sitting calmly while surrounded by flames. The text “I’M FINE” is carved into the left side, while the dog character sits contentedly despite the chaos represented by the flame patterns around it. This internet culture reference adds a comedic twist to traditional Halloween decorating.
Classic Mickey Mouse Face
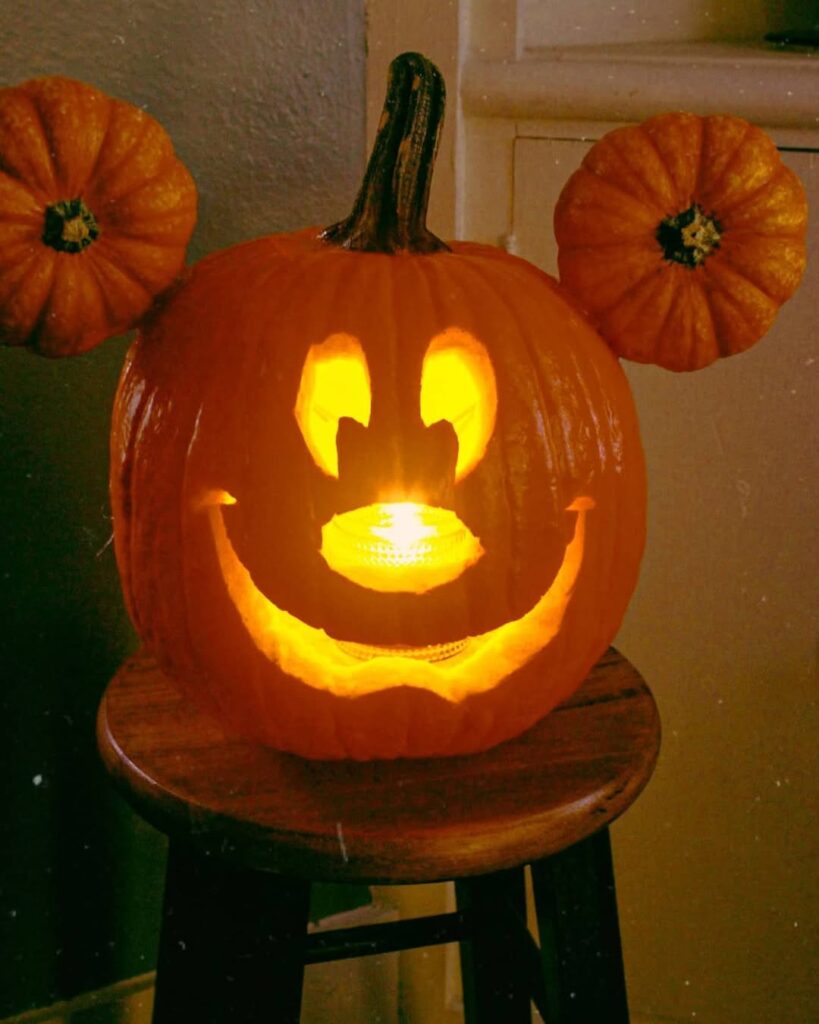
A cheerful, traditional Mickey Mouse face carving featuring his signature round ears, button nose, and warm smile. This simple yet effective design is perfect for beginners or those wanting a recognizable Disney icon. The illuminated face creates a welcoming, family-friendly Halloween decoration that appeals to Disney fans of all ages.
Inside Out – Anger Character
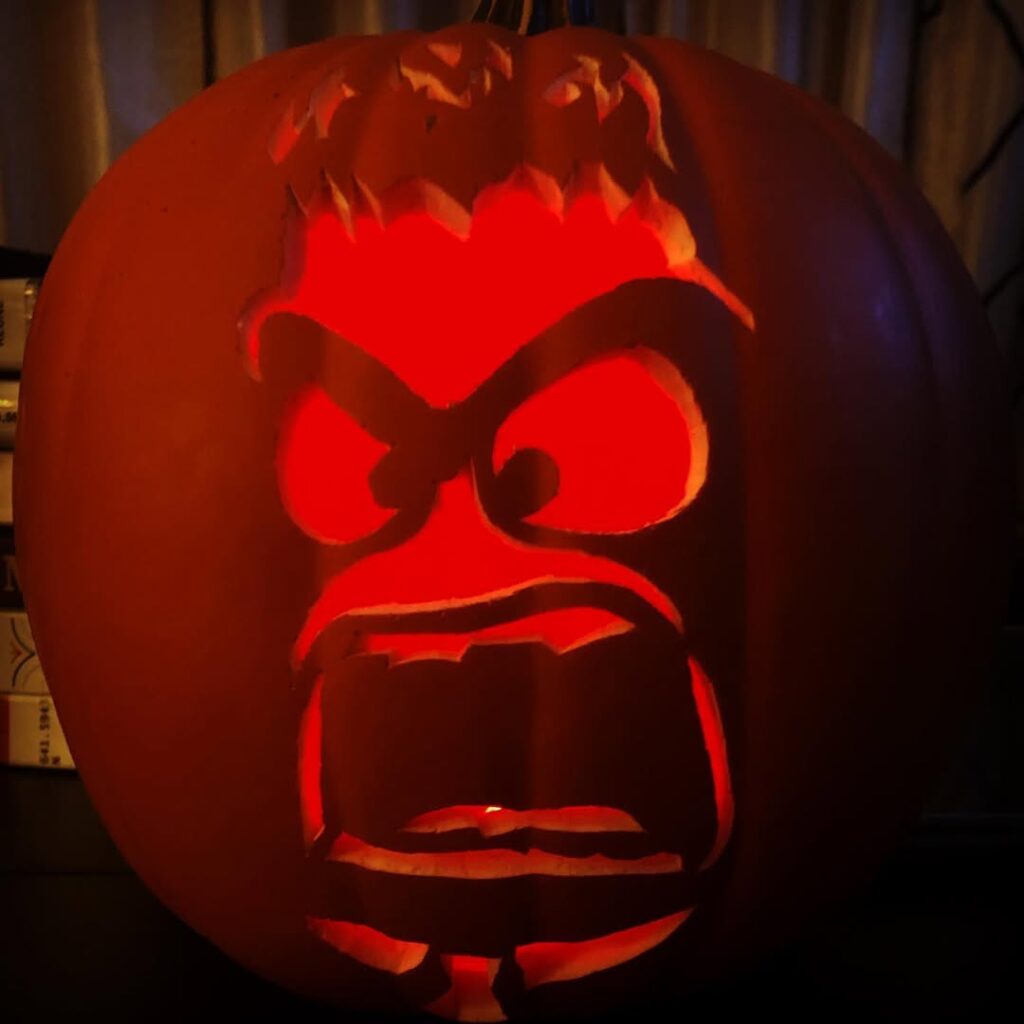
This bold carving depicts Anger from Pixar’s Inside Out, with his characteristic flaming hair, thick eyebrows furrowed in frustration, and wide-open mouth expressing exasperation. The detailed expression perfectly captures the character’s personality, and the red lighting enhances the emotional intensity of this fiery emotion character.
Two Mouse Dancing
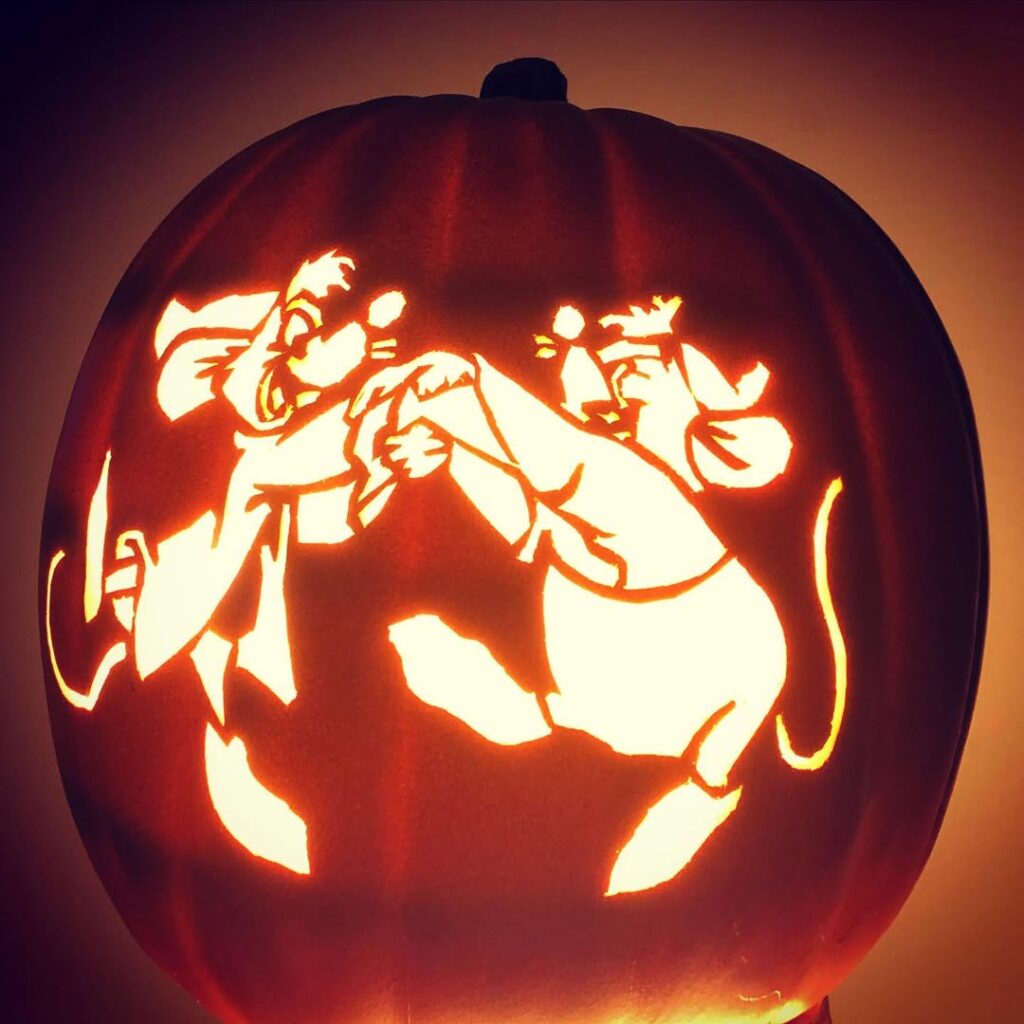
A dynamic action scene showing the Headless Horseman from Disney’s “The Legend of Sleepy Hollow” segment. The intricate carving captures the horseman mid-gallop on his rearing steed, creating a sense of motion and drama. This classic Disney villain makes for a perfectly spooky yet family-appropriate Halloween decoration.
Mike Wazowski from Monsters, Inc.
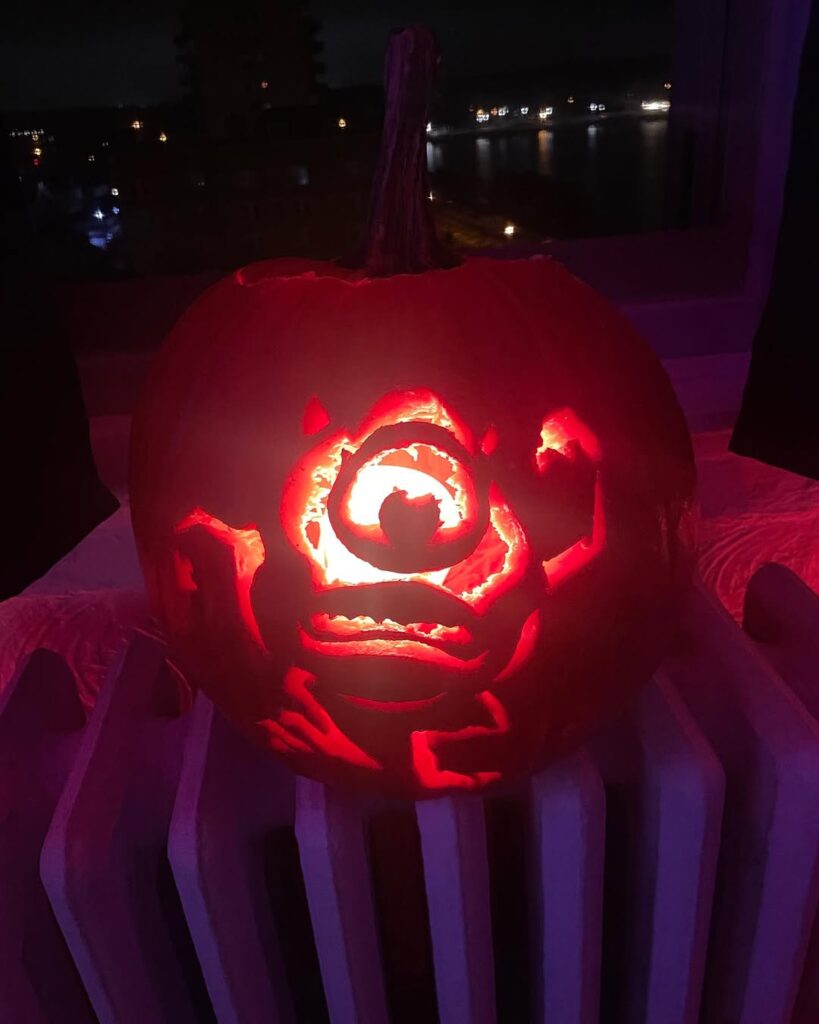
This playful carving features Mike Wazowski with his single large eye as the focal point, surrounded by his characteristic spherical body, small horns, and arms and legs. The cyclops character from Monsters, Inc. is brought to life through clever lighting that emphasizes his singular eye, creating a fun and recognizable Disney-Pixar tribute.
Stitch from Lilo & Stitch (Day and Night Views)
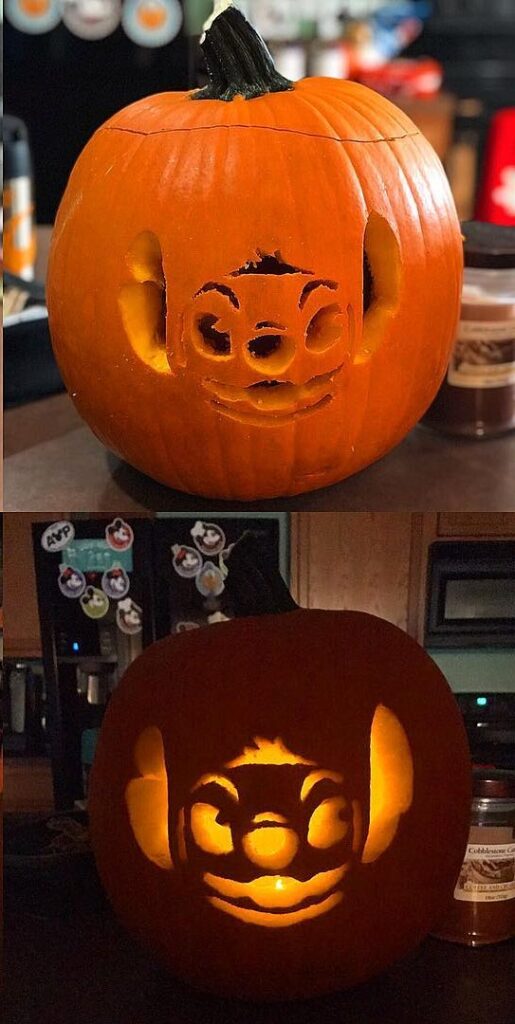
This two-photo showcase displays Stitch both unlit and illuminated. The carving captures Stitch’s mischievous expression with his large eyes, prominent nose, and characteristic smile. The comparison between daylight and nighttime views demonstrates how effective lighting transforms the carving, highlighting the three-dimensional sculpting technique used to create depth in the character’s features.
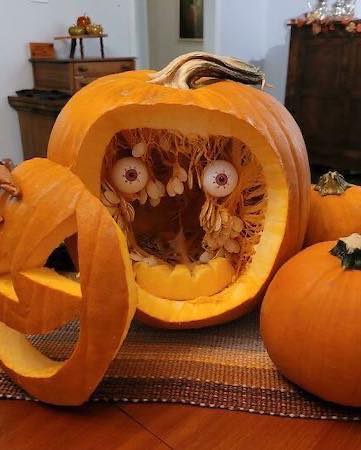
Stitched Horror Pumpkin
This gruesome design features:
- Deep gashes carved into the pumpkin surface
- Fake stitching (likely using wire, string, or painted details)
- Red “blood” accents (food coloring, gel, or paint)
- Dramatic lighting from within showing through the wounds
- Layered carving to create depth in the cuts
Pumpkin-Eating-Pumpkin
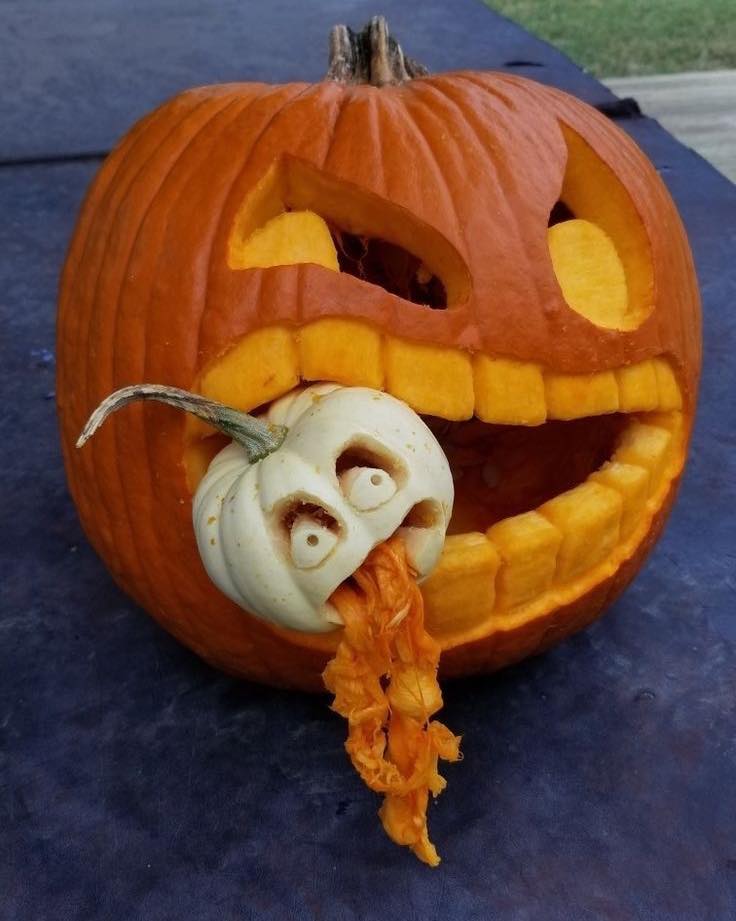
Another cannibal theme using:
- A large pumpkin with wide-open mouth carved deeply
- A smaller white pumpkin positioned to look like it’s being consumed
- “Vomit” effect created by carving stringy flesh
- Expression carved to show distress
- Multiple pumpkin coordination for storytelling
Pumpkin Eating Smaller Pumpkin
Similar concept with different execution:
- Aggressive facial expression with fanged teeth
- Smaller pumpkin carved with fearful face
- Positioned to appear the small pumpkin is being bitten
- Use of negative space to create depth
- Careful positioning for the narrative effect
Owl Design with Multiple Pumpkins
An artistic composition featuring:
- Large pumpkin carved to frame an owl shape
- Smaller pumpkins used as wings
- Textured carving to simulate feathers
- Layered depth carving for dimension
- Creative use of multiple pumpkins as one sculpture
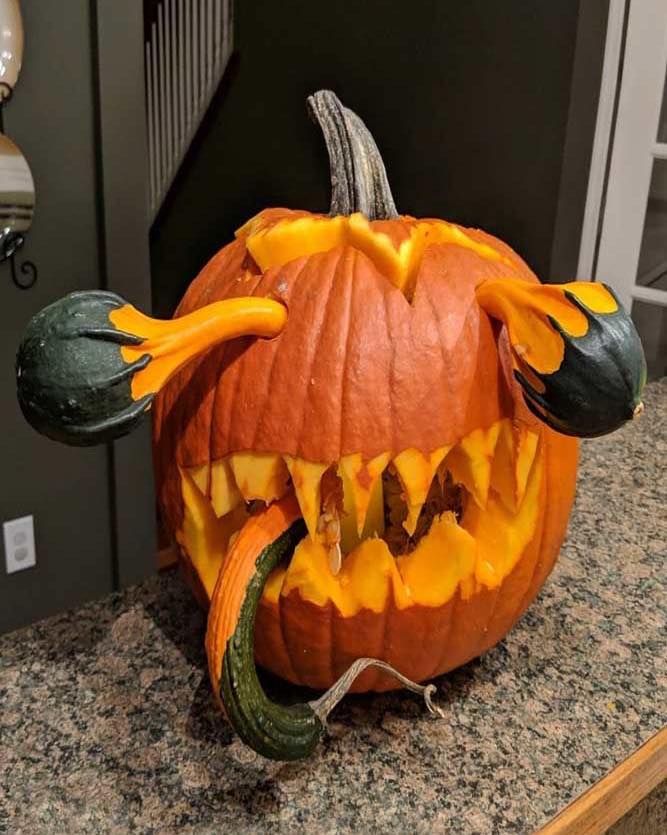
Monster with Gourd Tentacles
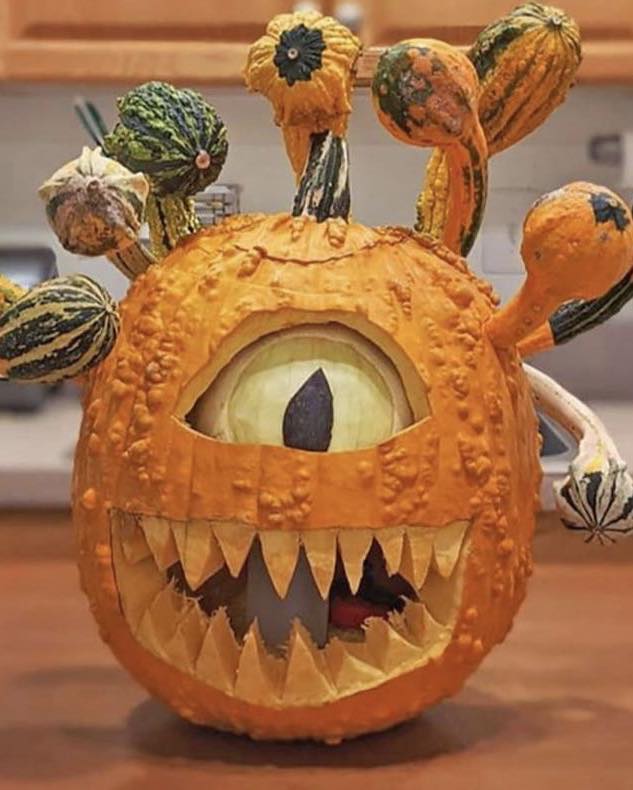
A creative multi-gourd design showing:
- Main pumpkin with large eye and toothy mouth
- Decorative gourds attached as “hair” or tentacles
- Single large eye design with pupil detail
- Sharp triangular teeth carved in rows
- Mixed squash varieties for texture and color variation
Monster with Gourd Eyes/Antennae
Another multi-gourd creation featuring:
- Bulbous gourds positioned as eyes or stalks
- Wide, aggressive mouth with jagged teeth
- Another gourd positioned as a tongue
- Creative attachment methods (likely skewers or carved indentations)
- Dramatic expression using color contrast
Elegant Sunflower Pattern Jack-o’-Lantern
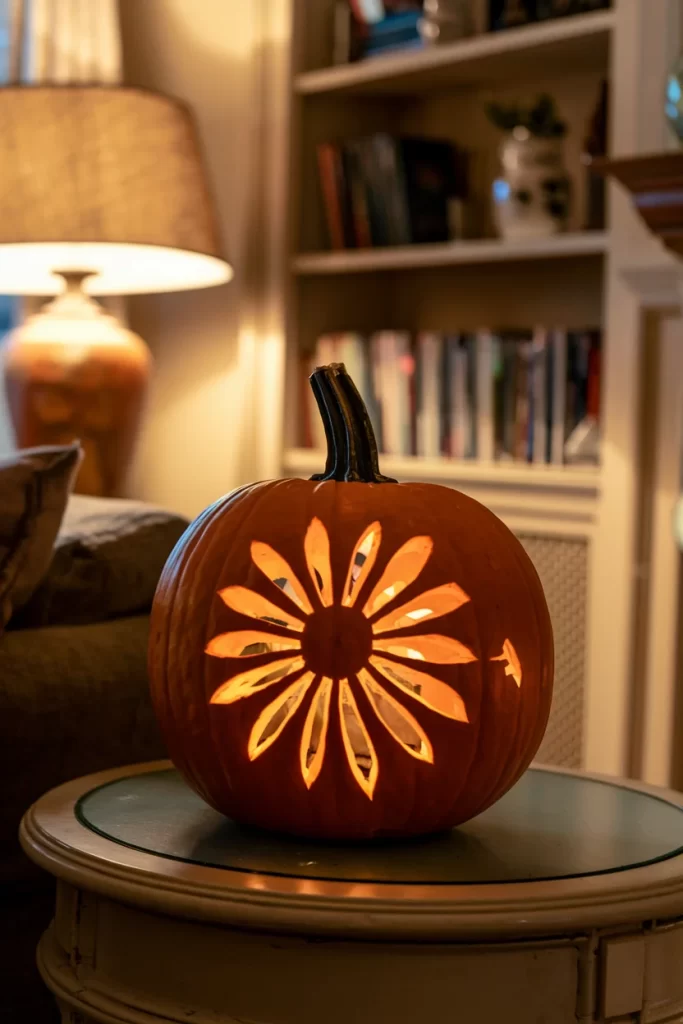
Steps:
- Cut a circular opening at the top and remove all pulp and seeds
- Draw a circle in the center of the pumpkin (about 3 inches diameter)
- Sketch 12-16 petal shapes radiating outward from the center circle
- Use a thin carving knife to carefully cut out each petal, starting from the center
- Carve the center circle last, making it slightly deeper than the petals
- Sand rough edges with fine sandpaper for smooth light diffusion
- Place LED candle or small light inside
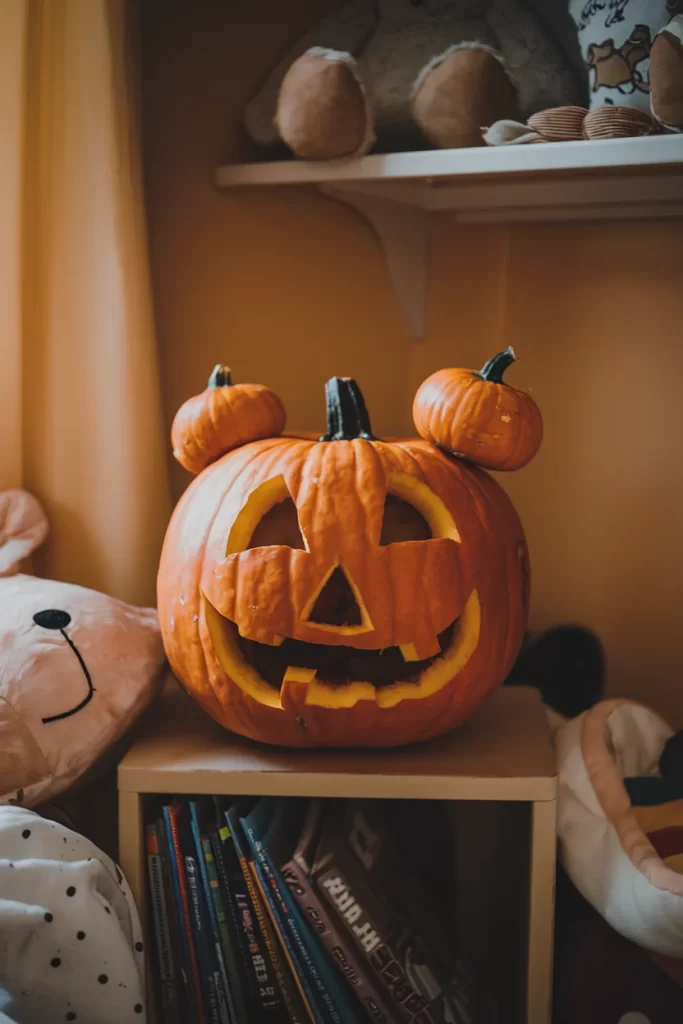
Classic Happy Face Pumpkin
Steps:
- Cut top opening and clean out interior completely
- Draw two triangular eyes, positioning them evenly on the upper half
- Sketch a small triangular nose centered below the eyes
- Draw a wide curved mouth with jagged teeth
- Cut out eyes using a small serrated knife, working from inside corners outward
- Carve the nose opening
- Cut the mouth outline, then carve individual teeth segments
- Insert battery-operated candle for safety
Whimsical Bunny Ears Jack-o’-Lantern

Steps:
- Clean out pumpkin through top opening
- Carve two oval eyes and small triangular nose
- Create curved smiling mouth below nose
- Cut two ear shapes from pumpkin scraps or foam
- Carve small slots at the top of pumpkin head
- Insert ears securely into the slots
- Use toothpicks to reinforce ear attachment if needed
- Add internal lighting to illuminate the face
Adorable Puppy Dog Pumpkin
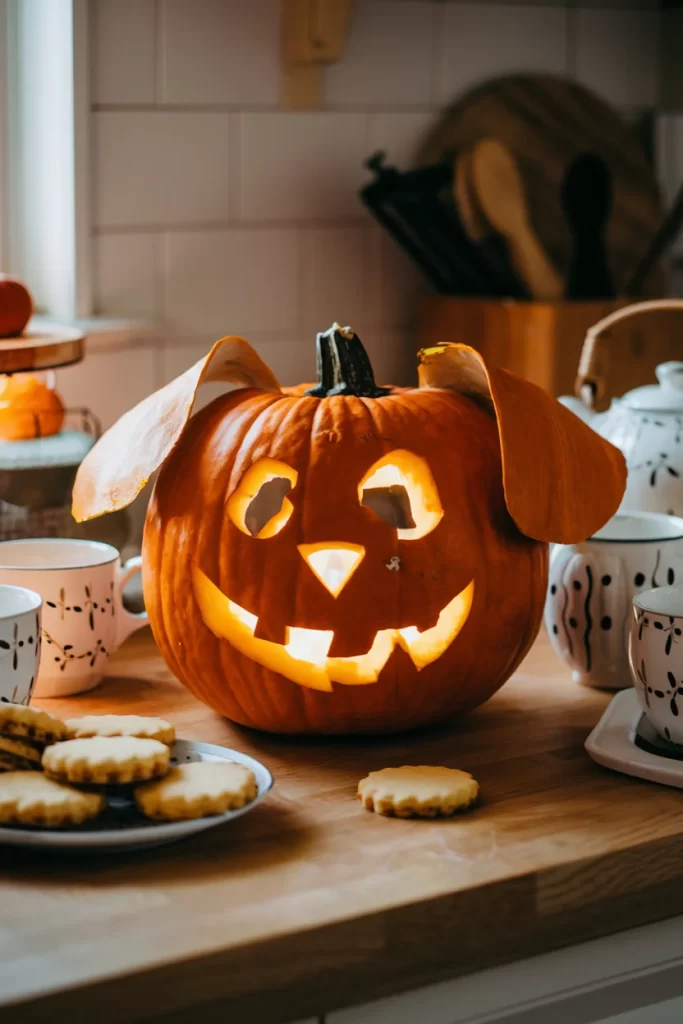
Steps:
- Remove top and hollow out pumpkin thoroughly
- Cut two circular eye holes, slightly oval shaped
- Carve triangular nose pointing downward
- Create curved mouth line under the nose
- Cut two ear shapes from additional pumpkin pieces
- Score attachment points on sides of pumpkin
- Secure ears with wooden skewers or toothpicks
- Place light source inside to bring the face to life
Traditional Halloween Jack-o’-Lantern Display
Steps:
- Cut zigzag pattern around top circumference and remove lid
- Scoop out all pulp, scraping walls smooth
- Draw triangular eyes with permanent marker
- Sketch triangular nose below and between eyes
- Create wide mouth with uneven, jagged teeth
- Cut out all features using sharp pumpkin carving tools
- Test fit candle or light before final placement
- Position in outdoor display with autumn decorations
Intricate Owl Design Pumpkin
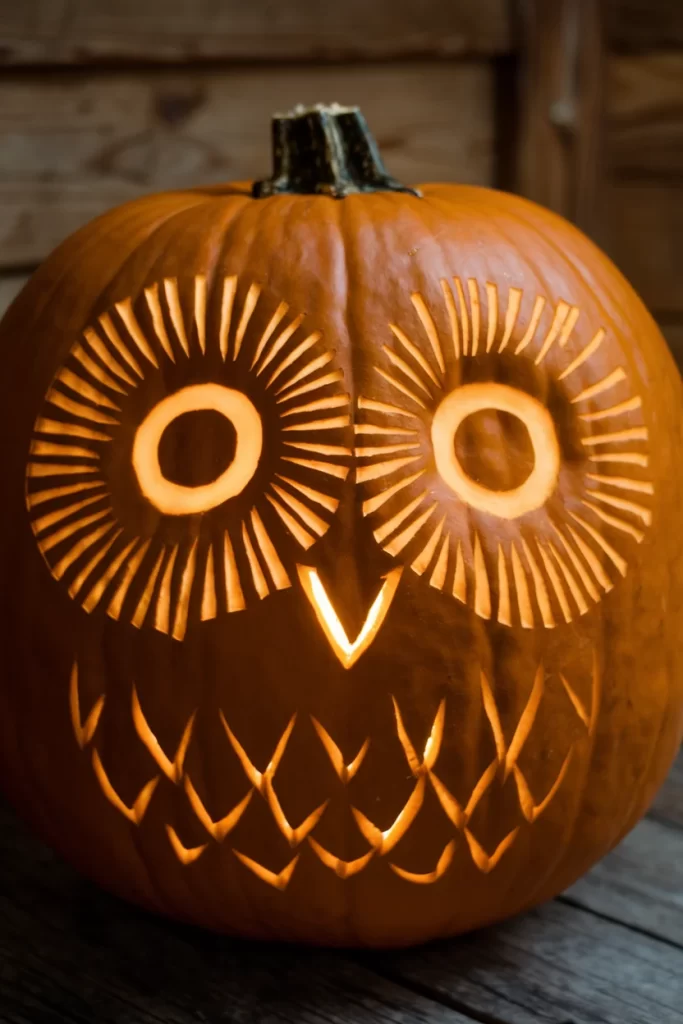
Steps:
- Prepare pumpkin by cleaning interior completely
- Print owl template and tape to pumpkin surface
- Transfer design using small holes poked through paper
- Start with large circular eyes, carving concentric circles
- Use carving tools to create radiating feather lines around each eye
- Carve small triangular beak between the eyes
- Add detailed feather texture patterns across the body area
- Use different carving depths to create layered lighting effects
Sophisticated Sunflower Table Centerpiece
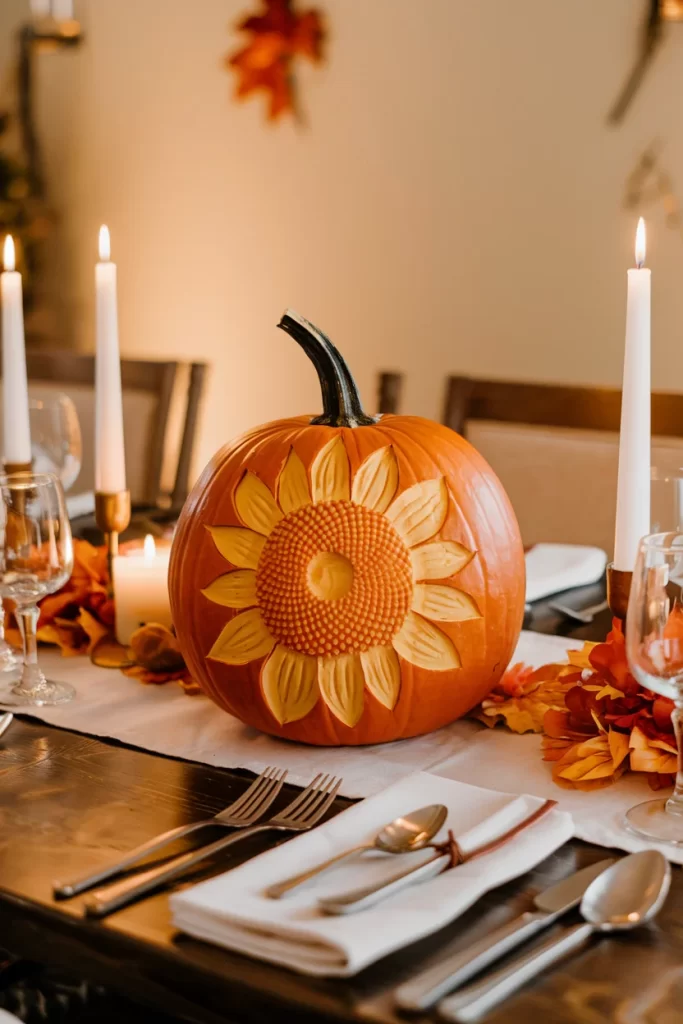
Steps:
- Cut opening and remove all interior contents
- Draw large circle in center (4-5 inches across)
- Create dotted pattern inside center circle for texture
- Sketch 16-20 petal shapes around the center
- Carve center circle with multiple small holes for textured light
- Cut each petal carefully, varying the depth slightly
- Smooth all edges for refined appearance
- Use warm LED lights for elegant ambiance
Delicate Monarch Butterfly Pattern
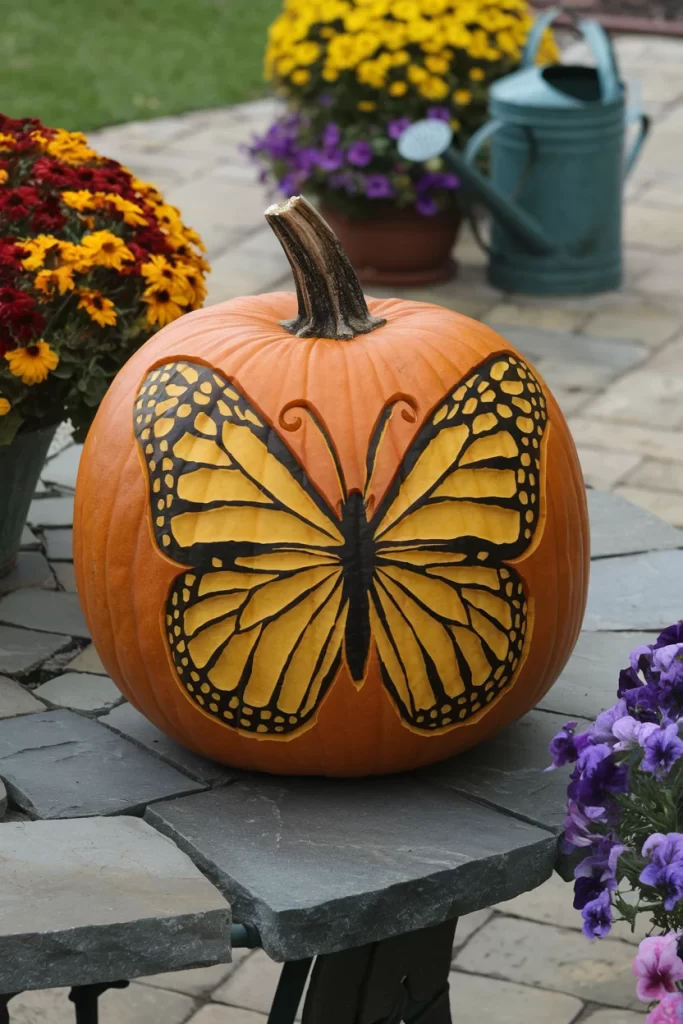
Steps:
- Clean pumpkin and prepare smooth carving surface
- Draw butterfly outline with body running vertically down center
- Sketch upper wing patterns with large sections and spots
- Add lower wing details with smaller pattern elements
- Begin carving with the largest wing sections first
- Create layered carving depths for wing dimension
- Add tiny holes for spot patterns using small drill bits
- Carve thin lines for wing veins and body segments
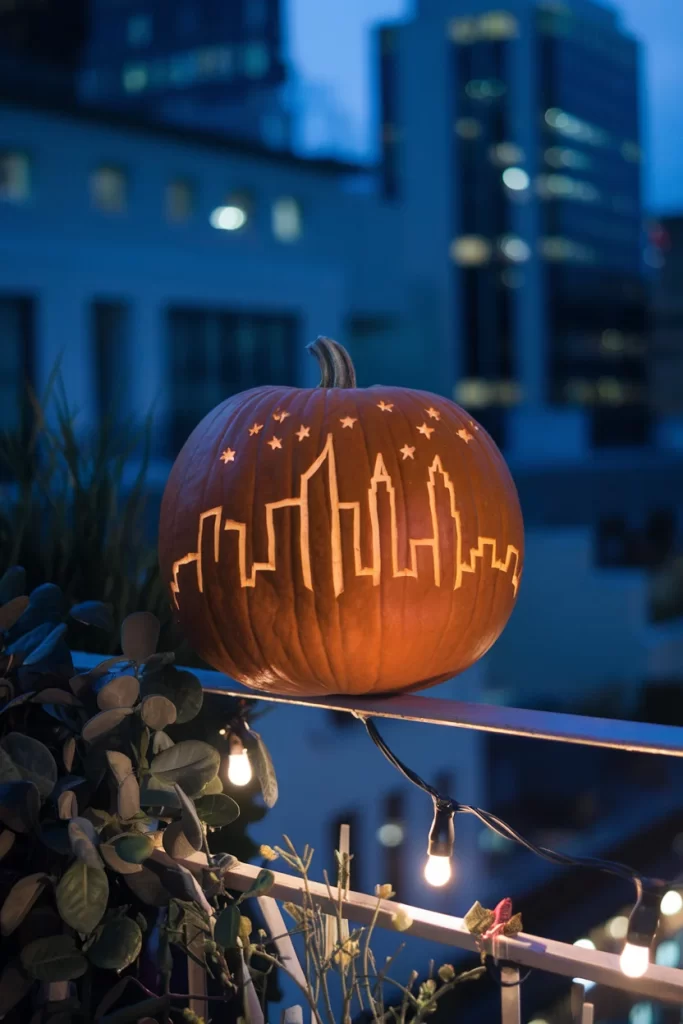
City Skyline Silhouette Design
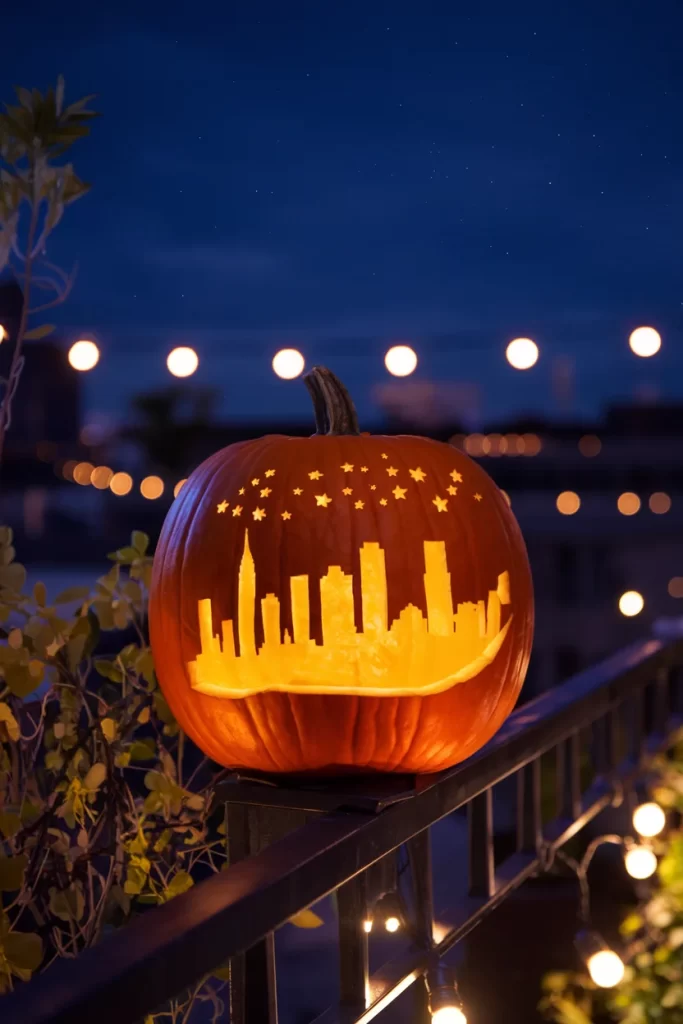
Steps:
- Remove top and hollow out pumpkin completely
- Sketch horizon line around middle of pumpkin
- Draw various building heights and shapes above the line
- Add small rectangles for windows in each building
- Create star shapes scattered above the skyline
- Cut out entire skyline as one continuous silhouette
- Carve individual windows and stars separately
- Position light to create dramatic urban glow effect
Celestial Moon and Stars Pattern
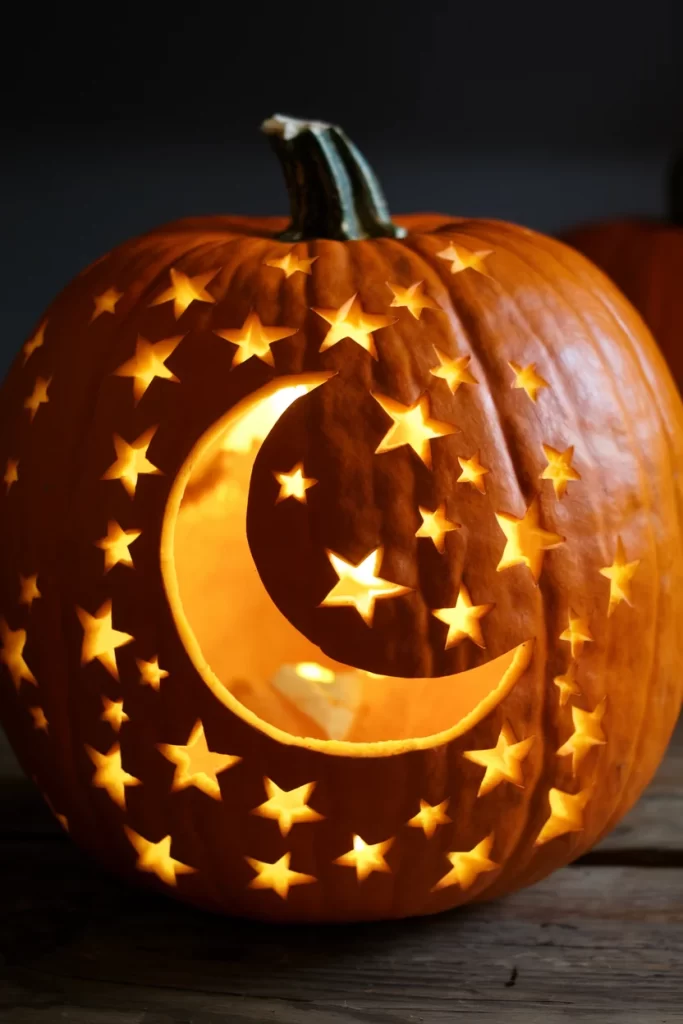
Steps:
- Prepare pumpkin by removing contents through top opening
- Draw large crescent moon shape on one side of pumpkin
- Sketch stars of varying sizes across remaining surface
- Start by carving the crescent moon outline
- Cut out interior of moon, leaving thick rim
- Use star-shaped cookie cutters as templates for uniform stars
- Carve stars at different depths for varied brightness
- Add small drilled holes for tiny distant stars
- Insert cool white LED light for magical nighttime effect
Spider Web Design
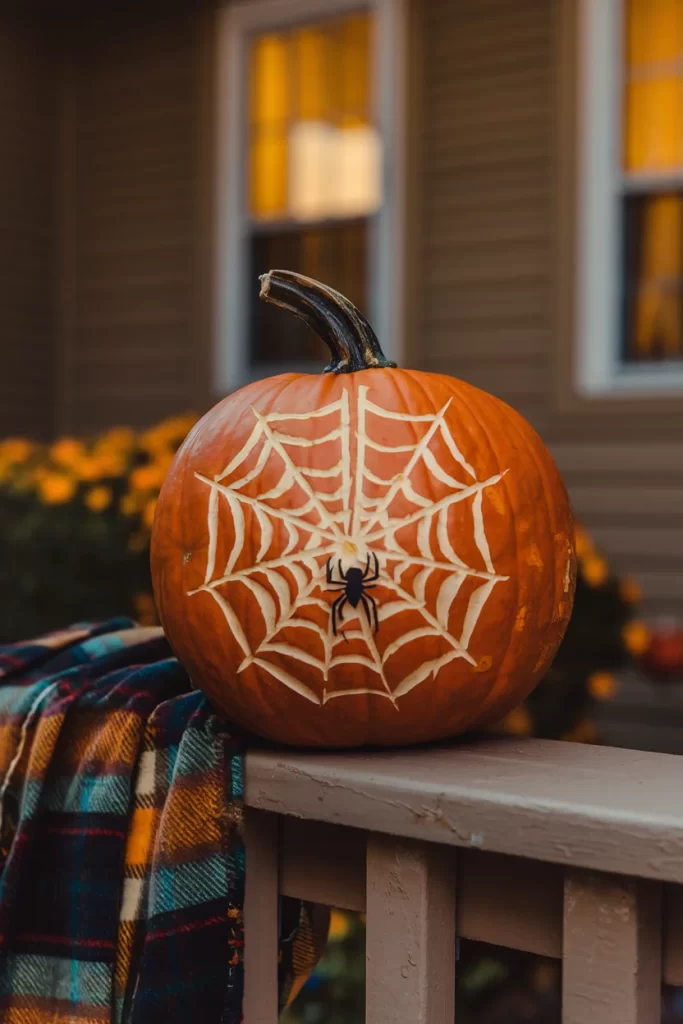
Steps:
- Cut a circular opening at the top of the pumpkin and remove all pulp and seeds
- Draw concentric circles on the front face, starting small in the center and expanding outward
- Connect the circles with straight lines radiating from the center, like spokes on a wheel
- Carefully carve along all the drawn lines, making shallow cuts that don’t go completely through
- Create thin connecting web strands between the main lines
- Attach a small plastic spider to the center of the web
- Place a battery-operated candle inside for illumination
Autumn Leaves Design
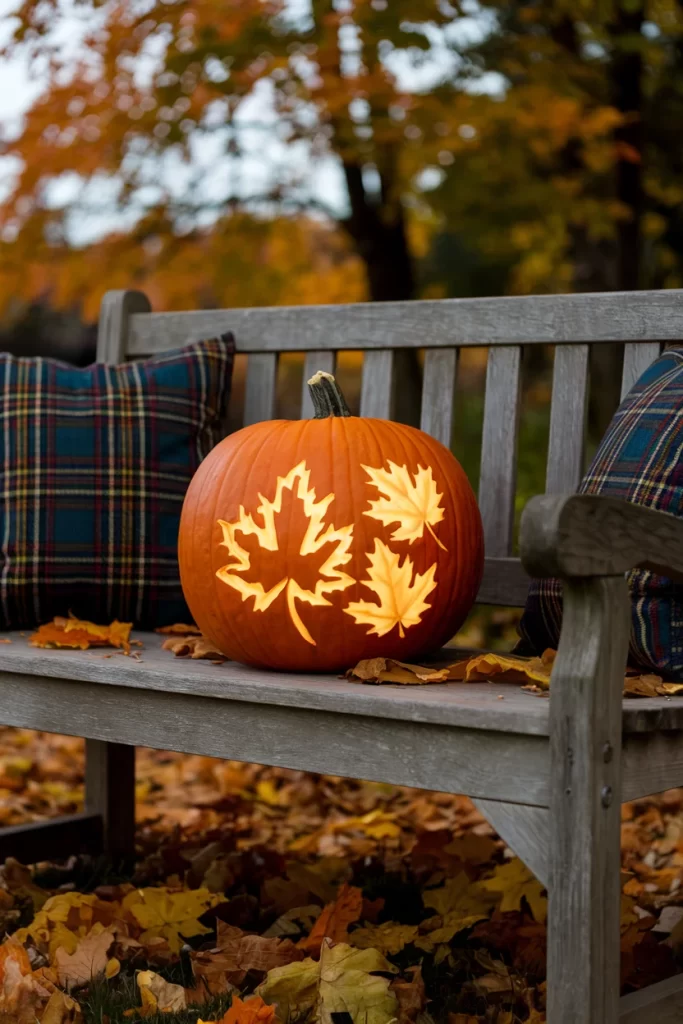
Steps:
- Clean out the pumpkin thoroughly through the top opening
- Print or draw maple leaf templates in various sizes
- Tape the templates to the pumpkin surface
- Trace around each template with a pencil
- Remove templates and refine the leaf shapes, adding vein details
- Carve out each leaf shape completely, cutting through the pumpkin wall
- Smooth the edges with a small knife or carving tool
- Insert LED lights or candles to highlight the leaf cutouts
Dotted Pattern Design
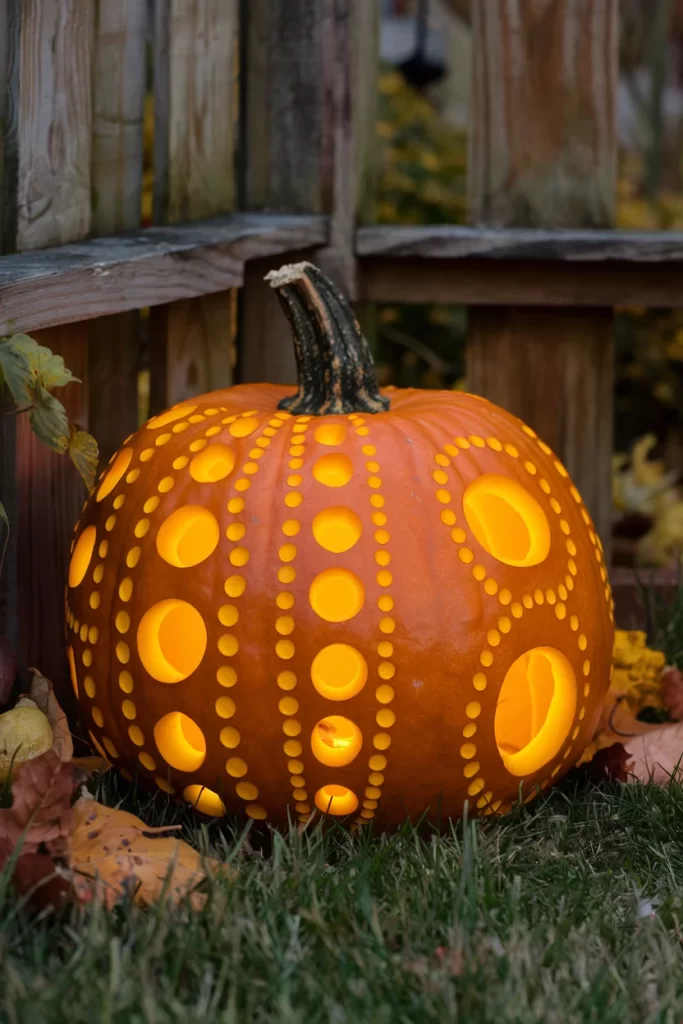
Steps:
- Remove the top and clean out the interior
- Plan your dot pattern by marking the pumpkin into sections
- Start with larger circles as focal points, spacing them evenly
- Use a large drill bit to create the bigger holes
- Fill in around large circles with medium-sized dots using a smaller bit
- Add tiny dots with the smallest drill bit to create gradient effects
- Create curved lines of dots to connect the larger elements
- Place a light source inside to create dramatic shadow patterns
City Skyline Design
Steps:
- Prepare the pumpkin by removing contents through the top
- Draw or trace a city skyline silhouette across the front face
- Add small rectangles for windows in the buildings
- Carve out the background sky area above the buildings
- Use small carving tools to cut out individual windows
- Drill tiny holes for stars in the sky section
- Add details like antenna or architectural features to building tops
- Light from inside to create a glowing cityscape effect
Chevron Pattern Design
Steps:
- Clean out the pumpkin interior completely
- Draw a horizontal center line around the pumpkin’s widest point
- Mark even intervals along this line as starting points
- Draw zigzag chevron patterns above and below the center line
- Make each chevron point sharp and evenly spaced
- Carve shallow grooves following the chevron lines
- Vary the depth of cuts to create dimension
- Sand rough edges smooth for a clean geometric look
Cat Silhouette Design
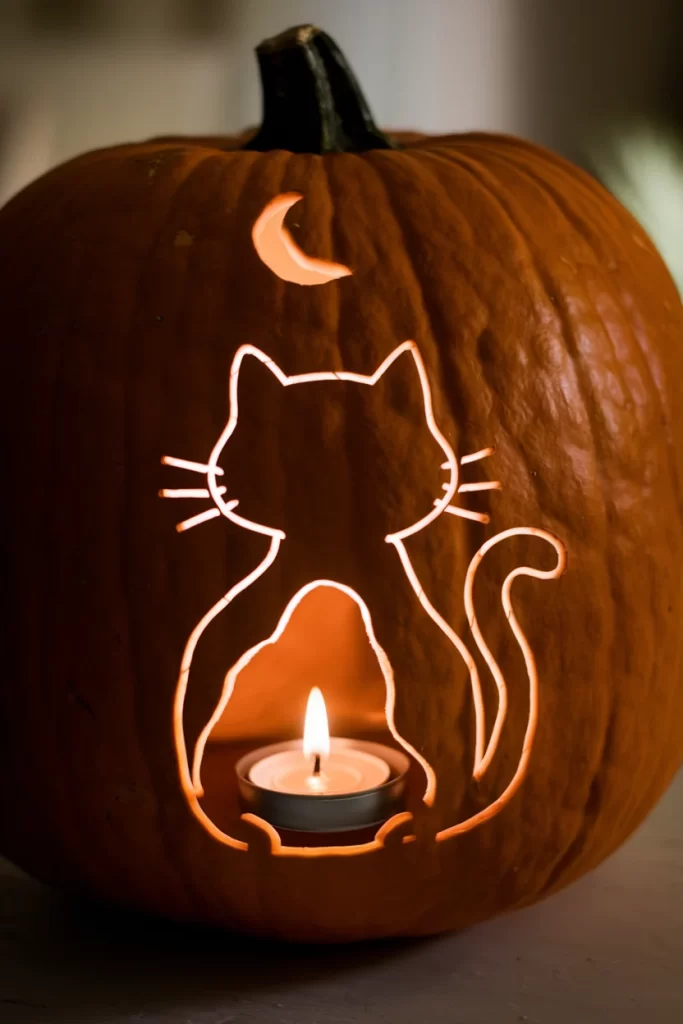
Steps:
- Remove pumpkin contents and create a smooth interior
- Draw or trace a sitting cat silhouette on the front
- Add a crescent moon shape above the cat
- Plan the placement for a tea light holder within the cat’s body
- Carve out the cat shape, leaving the tea light area as a shelf
- Cut whiskers and ear details with fine tools
- Carve the crescent moon completely through
- Test fit your tea light holder and adjust the shelf as needed
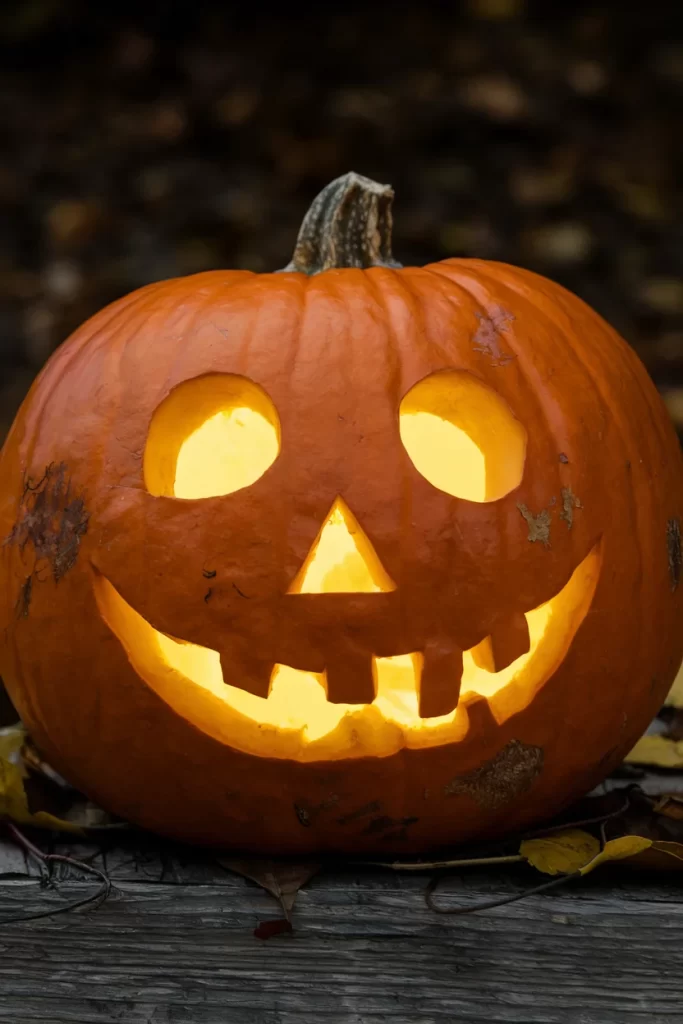
Classic Jack-o’-Lantern Design
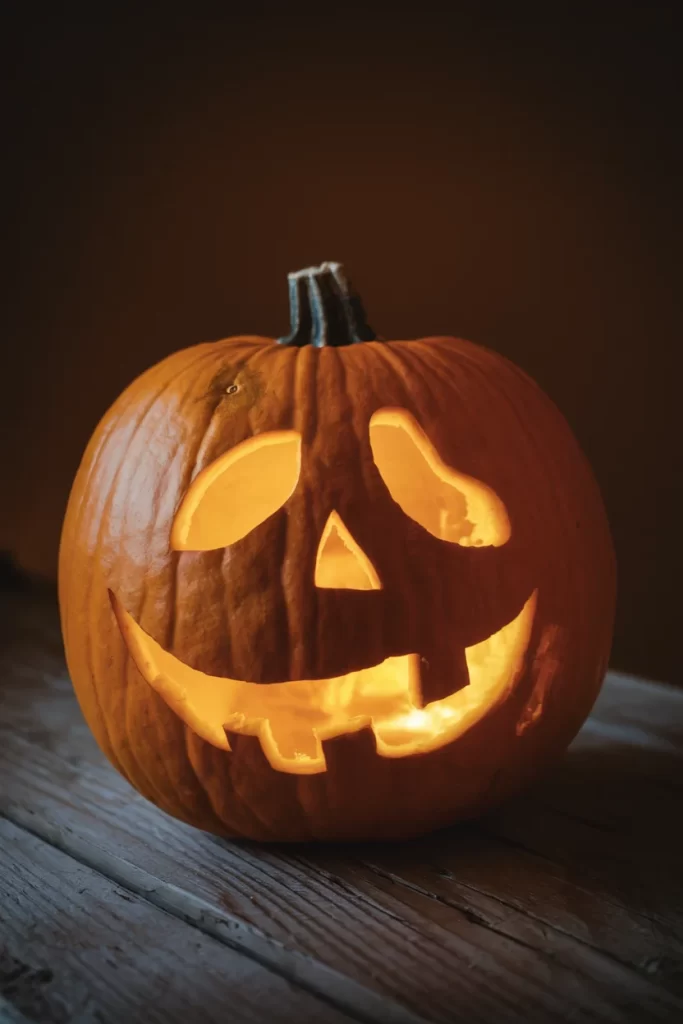
Steps:
- Cut a wide opening at the top and scoop out all contents
- Draw two large triangular eyes near the top third of the face
- Add a small triangular nose in the center
- Create a wide smiling mouth with triangular teeth
- Carve out each feature completely, cutting through the pumpkin wall
- Smooth all edges with the knife tip
- Create small notches in the smile to suggest individual teeth
- Place a candle inside for the classic glowing effect
Haunted House Design
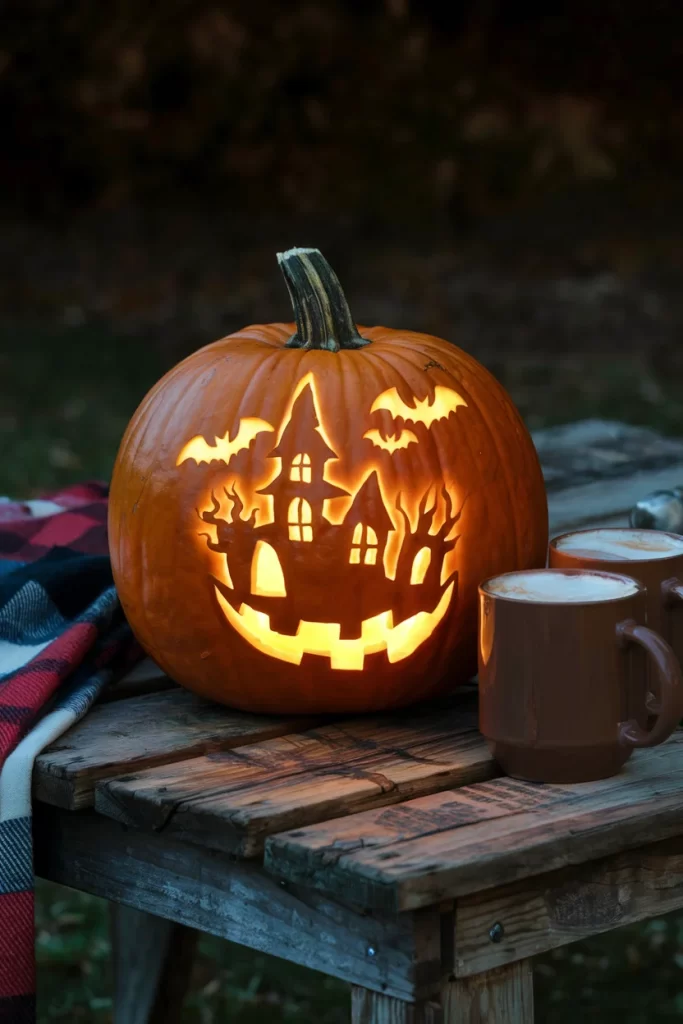
Steps:
- Prepare the pumpkin by cleaning out the interior thoroughly
- Draw a spooky house silhouette with multiple peaked roofs
- Add window shapes, a door, and architectural details
- Include flying bats in the sky area around the house
- Carve out the house structure completely
- Cut small rectangles for lit windows
- Use fine tools to add shingles, siding, or brick texture
- Drill small holes for the bat shapes
- Create wispy smoke from a chimney using curved lines
Heart Pattern Design
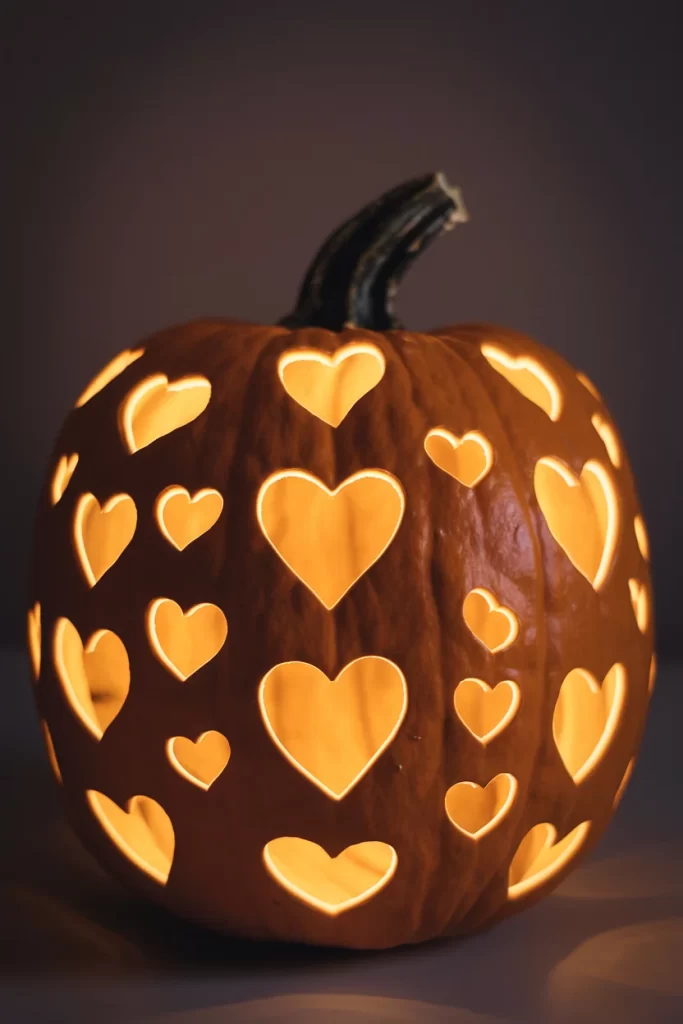
Steps:
- Remove the top and clean out all pumpkin contents
- Create heart templates in three different sizes
- Arrange hearts randomly across the pumpkin surface
- Trace around each template with pencil
- Start carving the largest hearts first, cutting completely through
- Add medium hearts, varying their orientation
- Finish with small hearts to fill empty spaces
- Smooth all curved edges carefully for clean heart shapes
Moon and Stars Design
Steps:
- Clean out the pumpkin interior through the top opening
- Draw a large crescent moon on one side of the pumpkin
- Plan star placement around the moon, using various sizes
- Carve out the crescent moon completely
- Cut out larger stars first, then add smaller ones
- Create some stars as simple holes, others as full cutouts
- Add tiny pinprick holes for distant stars
- Sand the moon’s curved edge smooth for a clean crescent shape
Classic Jack-o’-Lantern with Autumn Pathway Display
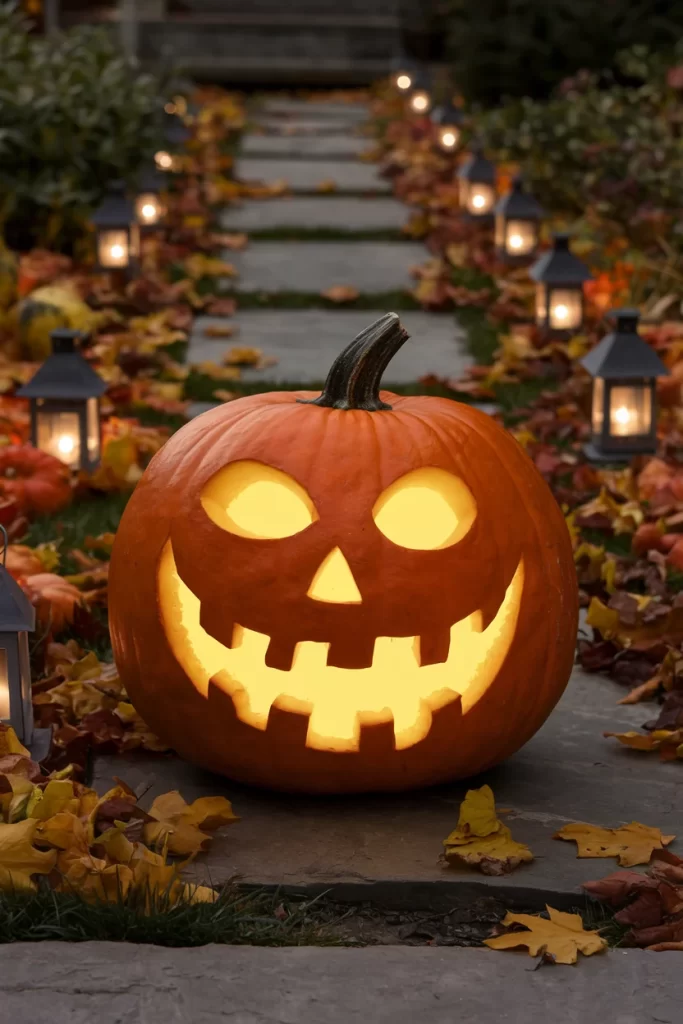
Steps:
- Choose a large, round pumpkin with a flat bottom
- Cut circular opening around the stem, angling knife inward
- Scoop out all pulp and seeds, scraping walls smooth
- Draw face design with marker – oval eyes, triangle nose, jagged smile
- Carefully carve along drawn lines with sharp knife
- Clean up rough edges with small paring knife
- Place battery-operated light inside and replace top
- Position on pathway with decorative lanterns and fallen leaves
Pumpkin House Lantern for Cozy Indoor Decor
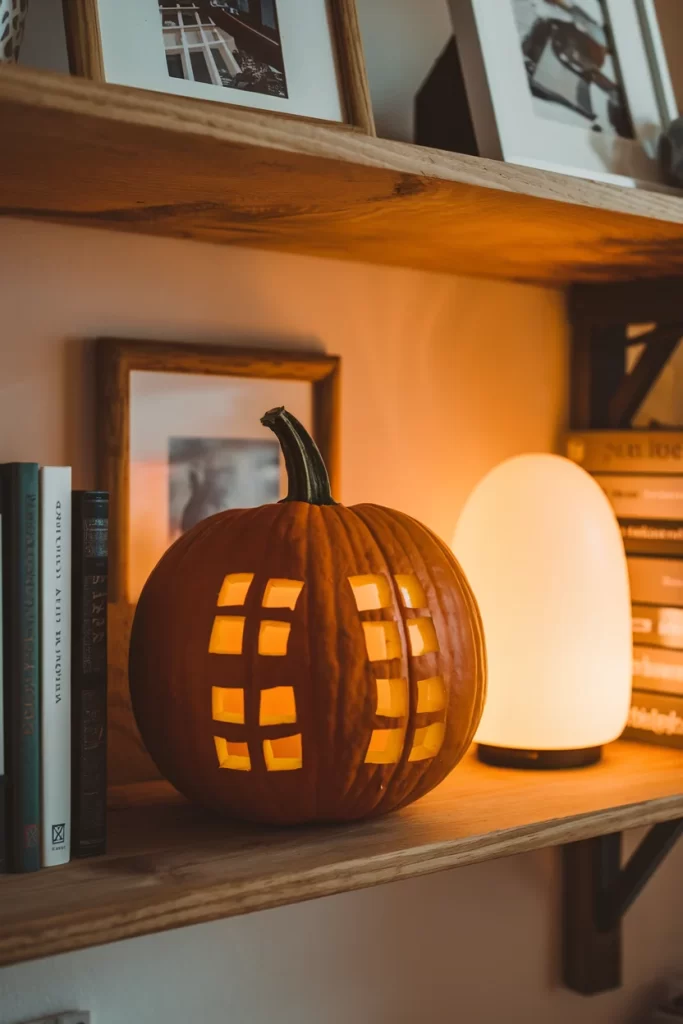
Steps:
- Select a medium-sized pumpkin with good proportions
- Cut top opening and thoroughly clean interior
- Use ruler to mark evenly spaced squares on front and sides
- Create paper square templates for consistency
- Trace squares onto pumpkin surface with marker
- Carefully carve each square window, keeping edges clean and straight
- Test fit with LED tea light to ensure proper illumination
- Place on bookshelf or table with complementary decor items
- Turn on light to create cozy house-like glow